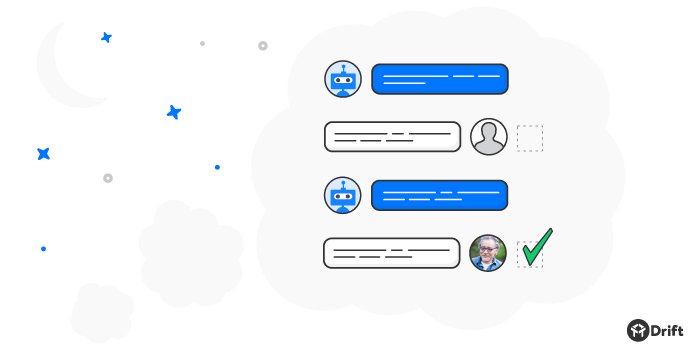
Last month we introduced a new member of the Drift product family: LeadBot™.
Designed to help sales teams capture and qualify leads in real-time, LeadBot is an intelligent sales assistant that can supplement or completely replace traditional lead forms.
Even when all of your salespeople are snug in their beds, LeadBot can continue to run on your website and ask all of the same qualifying questions your sales team would ask.
When it debuted on Product Hunt, the response was incredible — it felt like we’d hit on an actual problem that marketing and salespeople needed help solving.
Here are some highlights:


(FYI: Tom Wentworth is the CMO at RapidMiner and was a LeadBot beta tester.)
But here’s the thing: While we’ve talked a lot about what LeadBot can do, what we haven’t talked a lot about is what LeadBot is doing, right this very moment.
So we decided to share three different ways we’re currently using LeadBot here at Drift:
- for capturing leads on our blog
- for qualifying leads on our pricing page
- for qualifying and upselling existing customers inside of the Drift app
Keep reading for a step-by-step breakdown of how you can get LeadBot to perform these same three tasks for your business.
1) Use LeadBot on your blog to capture leads.
So, you’ve figured out how to attract a bunch of traffic to your blog — nice job!
Now comes the tricky part: sorting through all of that traffic and capturing the contact info of people who’d actually be interested in your product.
The traditional approach has been to send your blog readers to a landing page where they can fill out a form. The Drift approach: have LeadBot capture (and qualify) leads on your blog entirely through messaging.
In order to get started, the first thing you’ll need to do is come up with a script for your LeadBot. There are three main sections to a LeadBot script:
- a greeting
- questions + follow ups
- a sign off.
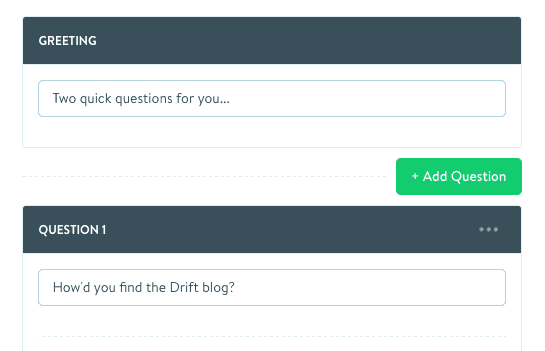
For the LeadBot campaign we currently have running on our blog, we strayed from our traditional “Hey there!” greeting and got straight to the point by writing “Two quick questions for you…”
We followed that up with our first question, “How’d you find the Drift blog?”

Here’s what that looks like inside of the Drift app when you’re setting it up:
Now comes the fun part: taking a guess at how people are likely to reply to your question and coming up with a few follow ups. (FYI: “follow ups” are simply responses that LeadBot gives based on how the people its chatting with respond.)
For the LeadBot on our marketing blog, we set up two potential follow ups for our first question, “How’d you find the Drift blog?”
The first is “Got it,” which appears if someone responds with a valid answer, like “I heard about it from a friend,” or “I found it through LinkedIn.”
The second potential follow up is “That’s OK,” which appears when someone doesn’t give an answer or gives an answer like “I don’t know,” or “I don’t remember.”
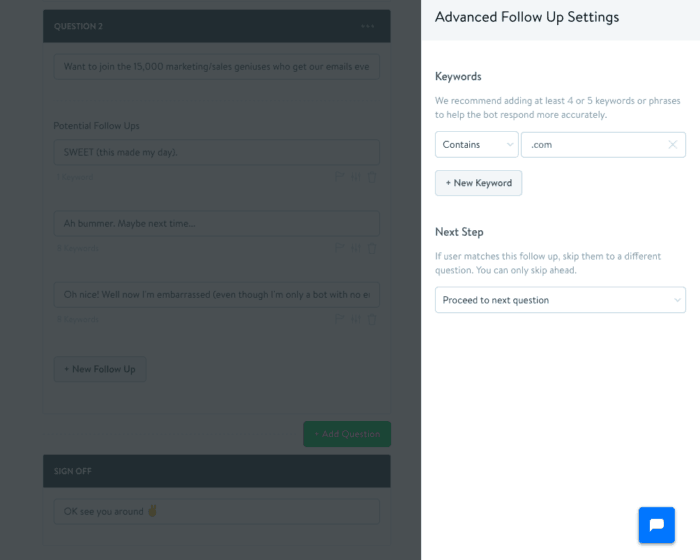
To help improve LeadBot’s accuracy, so it’s always serving up the right follow up response at the right time, we recommend creating a list of keywords (4 or 5 minimum) for each follow up that you can add via our advanced follow up settings. (You can see the list we came up with for our “Got it” follow up in the screenshot below.) Having this list of keywords that LeadBot can reference helps it match your follow ups to the responses people give.

Alright, so that covers the first question in our LeadBot campaign. For the second question (which prompts people to enter an email address) we followed the same exact process.
First, we wrote out the question: “Want to join the 15,000 marketing/sales geniuses who get our emails every week? Just drop your email below.”
Next, we came up with a few follow ups, including “SWEET (this made my day),” which appears if someone enters an email address, and “Ah bummer. Maybe next time…” which appears if someone doesn’t want to leave an email address. (We also came up with a third follow up for folks who had already subscribed).
In order to help LeadBot recognize when someone has entered an email address, we specified in the advanced follow up settings that LeadBot should be on the lookout for keywords ending in “.com”. Check out the screenshot below to see what this looks like behind the scenes:
The last section of a LeadBot script is the sign off, which is a message that lets the person chatting with LeadBot know that the questions have come to an end.
For the LeadBot on our blog, our sign off is “OK see you around ✌️” (And yes, we felt the peace sign emoji was crucial.)
Once you’ve created and saved your LeadBot script, your next step is to hop over to the Campaigns menu and create a new LeadBot campaign. (Campaigns are how you control where LeadBots appear, whom they appear to, and how long they appear for.)
When you first create a new LeadBot campaign, you’ll see a dropdown where you’ll be able to choose the LeadBot script you created in the previous step. You’ll also be able select the inbox where you want a LeadBot’s conversations to be stored. (For this campaign, we chose our Sales inbox, since we want our sales reps to be able to connect with new leads as soon as possible.)
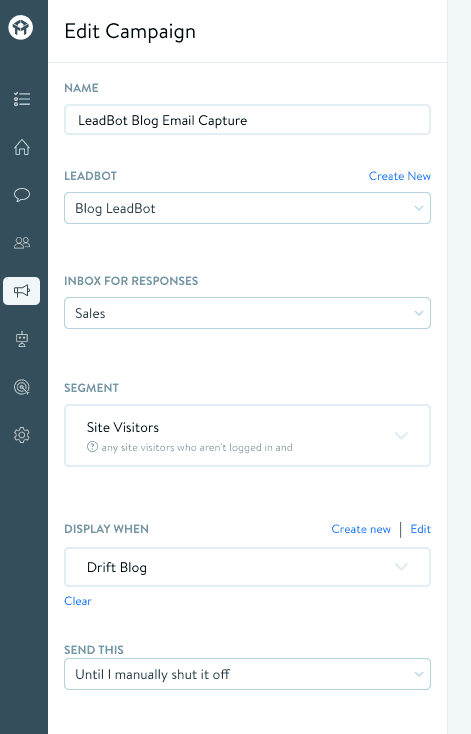
Next, you can choose a specific segment of people that you want your LeadBot campaign to appear to. You can then set display when conditions to fine-tune your targeting even further, and set how long you want the campaign to run for.
Because we created this LeadBot campaign to capture leads, we kept the targeting broad: We have it appear to site visitors who are on the Drift blog. And since we plan on running this LeadBot campaign on the blog for the foreseeable future, we set it to run continuously until we manually shut it off.
2) Use LeadBot on your pricing page to qualify leads.
Now that you’ve learned the basics of how creating a LeadBot campaign works, let’s dive into something a bit more advanced: using LeadBot to qualify leads on your pricing page.
This pricing page LeadBot was actually one of the first LeadBot campaigns we ever set up, and the sales team still loves it.
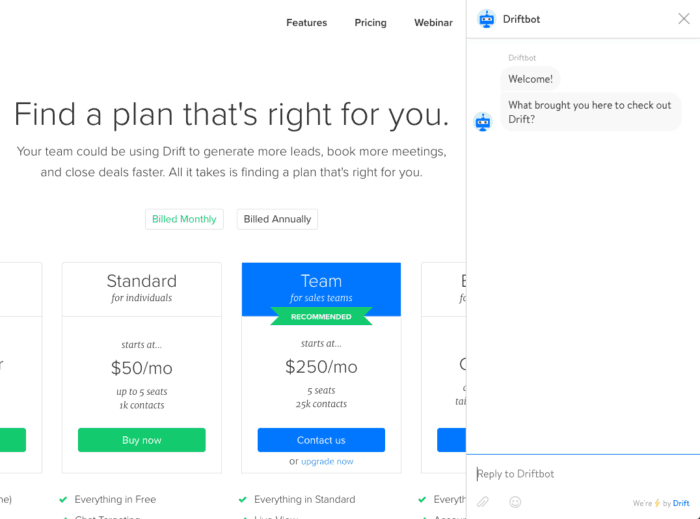
The good news: In order to build one of these yourself, you can follow the same basic steps we covered in the last section.
Firsts things first: Writing your LeadBot script.
When it comes to writing qualifying scripts for LeadBot, we recommend using the What?/Who?/How?/CTA approach. Here’s how it works.
- For your first question, have LeadBot ask what brought people to your website.
- Next, have LeadBot ask people who they are. What company do they work for?
- After that, have LeadBot ask how you can help them use your product.
- And finally, provide a call-to-action (CTA) at the end, such as prompting them to leave an email address or to schedule a time for a demo.
Of course, these are just guidelines to help you get started — not rules set in stone.
For example, the LeadBot on our pricing page varies a bit from the template above. Here’s the script we’re currently using:
- Question 1: What brought you here to check out Drift?
- Question 2: What website are you looking to use Drift on?
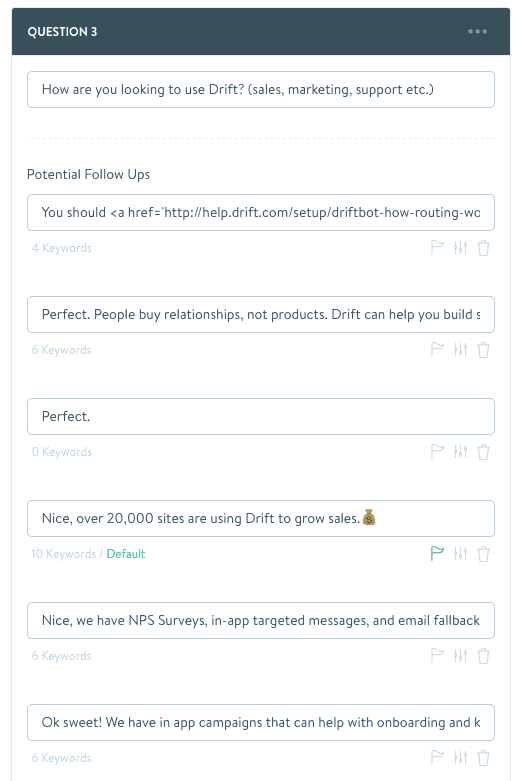
- Question 3: How are you looking to use Drift? (sales, marketing, support etc.)
- Sign off: What’s your email?? I can have someone reach out to show how Drift can grow your business
One tip for making LeadBot’s job easier: For each of your questions, set one of the follow ups you create as the default follow up. That way, LeadBot will know what its preferred response should be if it isn’t able to understand what someone’s saying and match it to another follow up.
For example, for our third question — “How are you looking to use Drift? (sales, marketing, support etc.)” — we set the default follow up as “Nice, over 20,000 sites are using Drift to grow sales.?”
Here’s what that looks like behind the scenes:
Just like with the LeadBot campaign we have running on our blog, we set Sales as the inbox for this campaign. That way, our sales reps are the first ones to see when a lead gets qualified.
It’s not uncommon for Drift sales reps to wake up to leads that have been qualified overnight by LeadBot. (That’s why we like to say that with LeadBot you can qualify leads before breakfast and close them before lunch.)
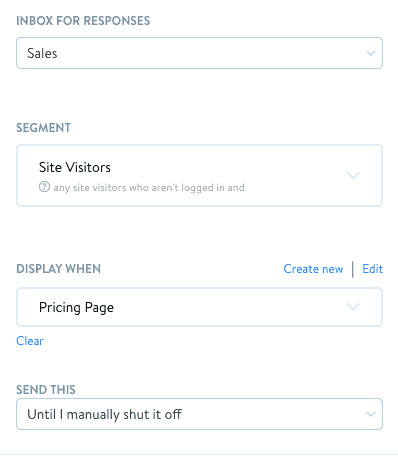
Overall, the settings for this campaign are nearly identical to the ones we set for the LeadBot campaign running on our blog. The only difference, of course, is that instead of having it appear to blog visitors, we have it appear to visitors on our pricing page.
3) Use LeadBot in-app to qualify and upsell existing customers.
The third use case I’m going to share is using LeadBot to qualify and upsell existing customers inside of your product.
When writing LeadBot scripts for these types of campaigns, we try to keep them short and sweet.
After all, these are customers who are already paying to use your product. Yes, it’s important to let them know if you have features available that could help them derive even more value from your product. But at the same time, you don’t want to overdo it and annoy them.
So when we set up an in-app LeadBot campaign for our Live View feature, we decided to keep it simple: a one-word greeting (“Welcome!”), followed by a single question (“Any questions about Live View?”), and then a sign off CTA (“Drop your email below if you’re interested in getting a trial going and I can have someone follow up with you”).
And that’s it!
Here’s what that entire LeadBot script looks like inside of Drift:
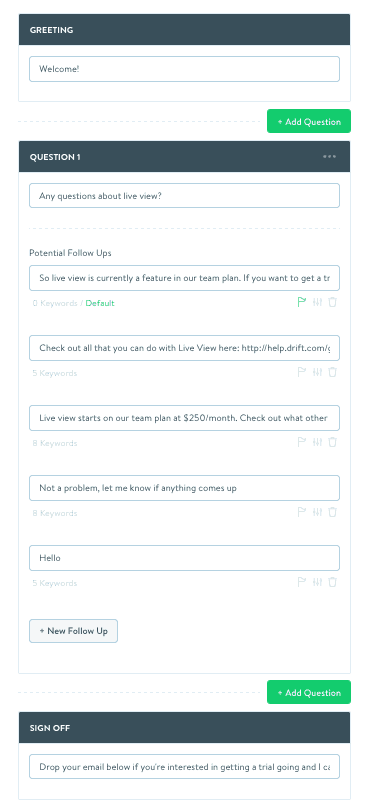
Once again, we had all the conversations from this campaign go to our Sales inbox (since our sales reps are responsible for handling upsells) and we set it to run until we manually turn it off. But unlike with the previous two LeadBot campaigns, with this one we set the targeting conditions so it only appears to existing customers who are checking out the Live View menu option inside of the Drift app.
Final Thought: This is just a starting point.
We’re constantly experimenting with new ways we can use LeadBot to make our sales & marketing process more efficient.
The examples above really only scratch the surface of what LeadBot campaigns are capable of, especially when you consider how fine-tuned you can get with your targeting using dynamic segments and display when settings.
For example, instead of having a LeadBot campaign appear to all of your blog visitors, you could have it appear to just those visitors who have registered for a recent webinar AND who have visited your blog 3 times or more in the past. You could then create a separate LeadBot for your blog that prompts non-webinar registrants to sign up for one. The options are virtually endless.
If you have any ideas for an amazing LeadBot campaign (or you’re a customer who’s running one right now), start a chat with us and tell us about it! We’d love to hear from you.


