Conversational Marketing Overview
What Is Conversational Marketing?
For a moment, close your eyes and imagine your 10-year-old self. The good old days, right? You’re carefree, you live in the moment, and take each day as it comes.
One of my simple pleasures as a kid was going to the penny candy store in Wayland, MA. My mom would give my siblings and me a set amount of money to spend. Feeling independent, we would rush in and walk around the store with the cashier, pointing to different candies to fill our bags.
That interaction with the cashier — working with them to fill up my bag, getting their recommendations, and learning what was in stock — was one of the best parts.
Now picture your 10-year-old self running into the candy store and ringing the bell on the counter…only to find that you actually have to fill out your contact information and come back once they reach out to you 24–48 hours later. I would’ve been heartbroken. And honestly, I would’ve found something better to do in the meantime. The candy would’ve been long forgotten.
I think you know where I’m going with this.
Today’s B2B buying world is like ringing a bell to no response. That second situation with the bell ring and no response sounds a lot like today’s B2B buying world. Gated content and forms over human interaction. We can learn a lot from the candy buying experience I had in my youth. It was easy, on my terms, and instant.
That’s where Conversational Marketing comes in.
In today’s buyer-first world, when a customer visits your site, they expect an experience that is on par with their favorite B2C experience, like going to the Apple store (or the penny candy store).
To keep up with skyrocketing expectations, you need to give customers what they want at the exact moment they want it.
In other words, your business needs a model that focuses on the customer first.
Conversational Marketing creates instant and personalized engagement with customers and buyers. It accelerates business revenue by removing friction from the customer experience. With Conversational Marketing, you can build and design conversations that make buying more enjoyable.
Why Is This Important?
Let’s face it, B2B buying today is broken.
Businesses serve up generic ads leading to unpersonalized landing pages. Buyers get lost in confusing websites and have to fill out lengthy forms just to get answers. They wait days, if not weeks, for replies, which often come back as stock emails. It’s a frustrating experience for everyone involved.
And while poor customer experience is bad for buyers, it is disastrous for your business.
When you let your customers down, it doesn’t just hit you once. It hits you again and again, driving up customer acquisition cost and sinking customer lifetime value. In fact, studies show that CX laggards grow revenue nearly six times slower than industry leaders.
This all boils down to a few things. When your customers don’t have good experiences on your site, your brand suffers, marketing pipeline falls, revenue shrinks, sales productivity tanks, and qualified leads dry up.
It doesn’t have to be that way.
How Do I Get Started?
After getting started with conversational marketing you will:
- Improve sales productivity.
- Build loyalty by driving better customer experiences.
- Generate revenue faster across the full customer lifecycle.
We’ll accomplish this with real-time insights, live chat, and playbooks.
Using real-time insights, your marketing team can proactively recognize and convert demand into qualified sales meetings or ongoing nurture campaigns.
With live chat, you can engage and qualify customers at the exact moment they show intent.
Lastly, playbooks will help you convert to pipeline faster by engaging with customers instantly, understanding their needs, recommending relevant information, and asking them to book a meeting directly in chat.
This adds up to a better ROI on your marketing spend and consistent, quality pipeline for your sales team.
We will work together over the course of this guide to start you on the first stage of your revenue journey: stage 0 — configuration. You will learn how to configure your Drift account, set up your sales teammates, connect your existing tech stack to Drift, and more.
Ready to help bring buyers great experiences? Let’s go.
Drift Insider Note
To learn more about Conversational Marketing, we recommend getting Conversational Marketing certified. This certification is led by Conversational Marketing experts who will provide real-world examples and actionable tips for you to implement today.
Setting Up Your Drift Account
What’s in this chapter
Setting Up Your Drift Account
Setting up your account is the very first step in your revenue acceleration journey. This is a simple yet crucial step.
When setting up your account, you will be prompted to input some basic account information like language preferences, company-specific information, and primary colors for how Drift will appear on your site.
Step 1: You’ll first be prompted to input some basic account information: Language preferences, Your greeting, and Full name.
![]()
Step 2: Next, you’ll be prompted to enter some company-specific information: Company name, Company website, and your avatar.
Step 3: You’ll then be prompted to set the primary and secondary colors for how Drift will appear on your website.
Step 4: Next, you’ll have the ability to choose the type of icon that will appear on your website.
Step 5: Within this step, you’ll have the chance to set your team’s business hours. These hours are when your team will be online to chat with site visitors.
For free plans, you’ll only need to do steps 1–2 listed above. The last step for free plans is editing the widget’s color theme and choosing the type of icon.
It’s important to note that as you design your bot and widget, your customers and prospects should feel like they’re interacting with your brand. Both your widget and bot should reflect your brand’s look and voice.
![]()
You can learn more about setting up your Drift account here.
Installing Drift on Your Website
Installing Drift is an important step towards seeing the full benefit of the Drift Revenue Acceleration Platform. Once you’ve implemented the code snippet, you’re one step closer to launching Drift.
Your Drift account has a unique code snippet that’s connected to your organization’s inbox.
Below is a video that covers how to install Drift on your website in a couple of quick steps. You can do this by embedding a few lines of JavaScript on your website or using Drift’s WordPress, Drupal, or Segment integrations.
Here is a help document that covers the necessary steps to installing Drift based on if you are on a paid or free plan.
We want our software to match your brand and style as much as possible, which is why we give you lots of customization options.
Here’s everything you can customize about Drift
- Turn on and edit your welcome message (more info)
- The default greeting which will show when no playbook is present and the widget is clicked on (more info)
- The language of the widget (here’s a list of them)
- The colors of the widget (more info)
- The font/typeface (in-app)
- The style of the default icons (in-app)
- Your organization/company name (in-app)
- Automatic email follow-up (in-app)
- The message that asks people for their email address (in-app)
- The hours the widget displays as online (more info)
- Stop visitors from starting new conversation threads (in-app)
- Who sees chat based on widget conditions (more info)
Paid customization features:
- Remove the Drift branding (available on Premium plans and above)
If you’re on a paid account, you can also customize your Drift bot. To change avatar:
- Go to Settings
- Under Settings locate App Settings in the side navigation
- Click Bot
- Select “Customize your bot”
![]()
How to Access Your Billing Information
As an admin, you may need to periodically update your payment method, check on your plan details, or expand your team.
To view all billing information, head to Settings > Organization settings > Plan and Billing or, click here.
You must be an Admin to access billing information.
![]()
Here you will see:
- Your plan (number of seats, number of contacts, monthly cost)
- Information about other Drift plans and upgrades via the Upgrade plan button
- Payment method and downloadable invoices via the Billing tab
Data Privacy
For GDPR compliance, end-users may need to give consent for Drift to save their information. Here is the full help document which covers:
- How to proactively ask users for consent
- Who will we show a consent form to?
- What countries does Drift consider to be in the EU?
- How to create a consent form
- Managing data
You can proactively ask users for consent by:
- Creating a consent form, as outlined below.This consent form will appear to users whose “has_consent” attribute is empty.
- Email users with a link to any DriftLink playbook. The form will automatically show and ask for consent from the user.
We will only show the consent form to a site visitor if their IP address matches a country you’ve set to show a consent form to.
We’ll also look at the visitor’s browser language to decide which of your consent forms to show. If you don’t have a consent form to match, we’ll display your default consent form.
![]()
Below are the steps needed to create a consent form.
Start by going to Settings > Data Privacy. Next, click Create form.
We use cookies to recognize users when they opt in or out.
Admins in Drift have the ability to retrieve or delete end-user data as well as the ability to get notifications if an end-user requests that their data be deleted. You can do this in Settings > Data Privacy. You can also do this using our API.
Security
SAML-based single sign-on (SSO) gives members access to Drift through an identity provider (IDP) of your choice. Read the full help article here.
Step 1: Configure your identity provider
To get started, you’ll need to set up a connection (or connector) for Drift with your IDP. If your preferred IDP doesn’t have a connector with Drift, you can use a custom SAML connection.
Step 2: Set up SAML SSO for Drift
Now that you’ve configured IDP, an admin can enable the SSO feature in Drift.
1. Go to Settings > Security > Configure SAML authentication
![]()
2. From here, you can verify your domain ownership. Once you’ve added your domain, you can verify it over HTTPS or DNS. All users who log in with this domain will be redirected to log in via your team’s IDP.
3. You can drop a metadata file or fill in fields manually for the Identity Provider Entity ID, SAML Redirect Endpoint, and the Identity Provider Public Key.
![]()
Recognition & Cookies
What is the Drift Cookie Security and Privacy Policy?
We are committed to privacy and current industry initiatives to protect individual rights on the internet. All cookies used by the Drift widget are first-party cookies assigned to the domain of your website. Drift cookies on your domain cannot be read by Drift widgets on other websites.
Read the full help document with FAQs here.
Importing contacts into Drift and creating contact segments helps you create more personalized buying experiences with Drift.
By importing contacts and creating segments, you can greet a site visitor by name or retarget a segment of contacts who’ve taken a specific action, like engaging with a playbook but not booking a meeting.
This will also allow you to enroll a contact segment in an email sequence or hide Drift from a segment of contacts.
There are a few ways to import contacts in Drift. You can upload contacts from a CSV, a Marketo list, or a Pardot list.
Importing from Marketo or a Pardot list will be dynamic, meaning as you update the list in Marketo or Pardot, Drift’s list will update as well. On the other hand, uploading a list of contacts via a CSV will be static.
You can access Import Contacts by clicking Visitors > Import Contacts.
To learn more about each method, read this help document. To learn how to export contacts, read this help document.
Drift segments allow you to filter contacts based on attributes and events, so you can provide the best buying experience for your prospects.
Read this help document to learn more about:
- The difference between dynamic and static segments
- Creating a segment from your contacts
- Adding a segment to a playbook audience
With contact segments, you can filter by dynamic, static, Marketo, Pardot, or Hubspot lists. A dynamic segment is one that updates over time. A static segment is a contact list that has been uploaded via CSV, which does not update over time.
After uploading your contacts, you can create a contact segment by going to the Contacts page in Drift and clicking Create filter.
![]()
You can then select filters to further segment contacts based on attributes or events that have taken place in a Drift playbook.
![]()
Accounts
Importing accounts is what allows you to roll out the red carpet for your site visitors. You can import accounts to target potential buyers in playbooks (more on that in stage 2), and let your sales reps know who is on your site through notifications and in their activity feed (Drift Prospector). Account-based marketing (ABM) is available on Premium and Enterprise accounts.
Uploading Accounts
To add accounts to Drift, you’ll need to upload the following properties:
- Name (company name, e.g. Drift)
- Domain (company domain, e.g. drift.com)
- Account owner’s email (Drift user, e.g. example@drift.com)
You can sync target accounts from Salesforce or import them via a CSV.
You can learn more about importing accounts in the below help documents:
Account Segments
Account segments allow you to organize your accounts into groups based on attributes on the account level.
Account segments can be found by going to Visitors > Accounts > Account Segments. You can learn more about how to create ABM playbooks and segment your Drift accounts here.
The Drift widget is responsible for managing the majority of your customers’ and visitors’ interactions with you through Drift. Setting up the widget to display when you want, where you want, and to whom you want is critical to succeeding with Drift.
What is a widget? A widget is a stand-alone application that can be embedded into third-party sites by any user on a page where they have rights of authorship (e.g. a webpage, blog, or profile on a social media site).
Our Drift widget is the chat bubble that appears on the bottom of your screen. It lets your end-users interact with messages you create and send through Drift chat.
Go to Settings > App Settings > Drift Widget > Hours, or click here. Select the Display To Pull down.
By default, the Display When condition will be Known and unknown visitors, so that your chat widget shows up to everyone who visits your site domain.
You can learn more about setting up and targeting the Drift widget as well as read some FAQs here.
Hours
This is where you set your Drift online and offline availability — think of this as store hours. Your widget and playbook follow these hours if they use Drift Status as a targeting condition.
![]()
This can be manual or automatic (i.e. automatically go offline when all teammates in Drift are away). You can learn more about online and offline: agent vs. widget here.
Advanced Settings
The Advanced section in the Chat Widget Settings is where users can toggle unique features with the chat widget.
By turning these on, you can further customize your site visitors’ user experience with Drift.
You can find these settings in your Drift app by clicking Settings > Drift Widget > Advanced.
![]()
In your advanced settings, you’ll see the following toggles for you to use:
- Allow incoming/outgoing attachments
- Allow incoming GIFs
- Badge notifications
- Play sound for new messages
- Flash tab
- Allow access to conversation history
- Email follow-up
- Ask site visitors for email: shows email capture box for default greeting and welcome message playbook
Learn more about all advanced settings here.
Multi-language widgets are available to customers who want to add additional languages to their Drift instance.
We’ve made sure that all conversations started from a German widget are maintained in German. In order to do this, we defaulted the language settings to be based on the widget language, rather than the browser language of the site visitor.
![]()
This is available for our FY22 Enterprise customers. Visit this help doc to learn more.
Audiences
What Is Drift Audiences?
Drift Audiences allows you to unify all relevant data from your tech stack into one place so you don’t have to transfer data among an exploding stack of website targeting tools.
You can use Drift Audiences to:
- Know where to take action and drive more pipeline
- Increase the ROI of all your marketing channels
- Deliver a VIP level website experience for your target accounts
Watch this video to learn more about what Drift Audiences is, how it can help you, and best practices for incorporating this data into your playbooks.
Drift Audiences is available on all Enterprise plans.
How do I use Drift Audiences?
Drift Audiences will show you a breakdown of:
- Site visitors who were shown a playbook, conversations started, emails captured, and meetings booked
- Target benchmarks based on composites of customers
- Trending data (week over week metrics) for a 12 week period
![]()
You can filter your audiences by:
- Top audiences (default)
- Website (domain, high-intent pages, top URL)
- UTM parameters (campaign, content, medium, source, term)
- Drift Intel (country, employee range, industry)
- Target accounts/lists (6Sense, Marketo, non-target, target)
- Custom Salesforce account picklist data
Once you filter to an audience, you can then view metrics for that specific audience, like the number of visitors in a given time period, number of visitors shown a playbook, number of conversations started, number of emails captured, meetings booked, and number of visitors not shown a playbook.
You can then create a playbook or clone an existing playbook based on a given audience.
Audiences also allows you to see how your existing playbooks are performing for a given audience. Read about that and more in this help document.
Help documents in this chapter:
What’s in this chapter
Why Do Integrations Matter?
Today, the customer is in control, business is digital, and the best experience wins. It’s critical that not only teams but also technology work as one. That’s why Drift offers more than 50 integrations, all aimed at helping you unlock your data to provide a better experience for you and your customers.
Integrating your current tech stack with Drift allows you to unlock insights like how many conversations you’re having, how many meetings you’re booking, and how that is translating into pipeline.
You can learn more about the importance of these integrations in the video below.
The three main reasons why you should integrate Drift with your current tech stack is bi-directional sync, creating a better customer experience, and providing end-to-end customer support.
Let’s break it down.
In marketing, there is a treasure trove of data about what people are interested in, what they’ve clicked on, what videos they’ve watched, and more. The trick is to unlock this data so your team can take action. That’s where Drift’s two-way integrations come in. You can bring everything together with bi-directional sync in real time.
Our top integrations for bi-directional sync include native integrations such as HubSpot, Marketo, Pardot, Eloqua, and Salesforce, as well as sales tools like Outreach and Salesloft.
At the top of every marketer’s mind is the goal of creating a better customer experience. This is why we invest so much in MarTech investments. Drift is a piece of your marketing technology puzzle. Our integrations with leading MarTech providers help to bring it all together.
Some of our most popular integrations for creating better site experiences include: 6Sense, Clearbit, and Demandbase.
Lastly, integrations with Drift help you provide an end-to-end customer support experience. We integrate with leading customer support providers so you can engage with your customers in real time, automate ticket creation, and surface relevant help articles.
Our integrations for customer success and support include Zendesk, Salesforce, Knowledge bases, and more.
View all our integrations here.
Integrating Drift with Your CRM and MAP
Integrating Drift with a single system is straightforward. But once multiple systems are introduced, the flow of data becomes crucial to prevent duplicates and improper lead handling.
The ideal state is a cyclical flow, where Drift sends data into your CRM, then your CRM sends data to your MAP, and Drift then reads data from your MAP.
Here’s an example:
![]()
- Drift is connected to both Marketo and Salesforce
- Drift sends leads to Marketo
- Drift sends activities to Salesforce
- Drift reads leads, contacts, and account ownership from Salesforce
The Set Up
Below are a series of guides to setting up specific integrations.
Salesforce
For the Salesforce integrations it’s important to note that the Salesforce user needs specific permissions which can be found here.
Marketo
Hubspot
Pardot
Eloqua
Google Analytics
Zapier
Slack
Drift Insider Note
You can learn how to set up all of your integrations in this Drift Insider class. This class contains training videos to walk you through connecting Drift to all of the tech you’re already using.
Salesforce and Drift
Why You Should Connect Salesforce to Drift
Drift’s native integration with Salesforce is the most extensive for any messaging platform. Drift connects your prospects to people in real time through conversation, and you can use all the information captured through your playbooks and conversations to book more meetings and close more deals.
To summarize, Drift can:
- Create and update leads in SFDC which originate in Drift
- Create and update contacts in SFDC which originate in Drift
- Send chat activity from Drift to SFDC
- Send meetings booked in Drift to SFDC
Setting up the integration is simple. Head to Settings > Integrations > Salesforce, or click here. You’ll be prompted to sign in with your Salesforce credentials.
![]()
For the Salesforce integration to work you:
- Must be on one of the following Salesforce editions: Enterprise, Unlimited, Developer, or Performance. The Professional edition with API access will also work.
- Must have the correct user permissions required by Drift within Salesforce. Please go here for full instructions.
- Must be the only Drift account connected to your Salesforce instance.
- Be on Drift’s Pro plan or above.
- Be an admin in Drift.
Once the integration is connected, Drift will be able to send leads, contacts, chat activity data, and booked meetings data to Salesforce. You will also be able to sync your account lists from Salesforce, and create and target ABM playbooks.
Other features include the ability to map Drift’s custom attributes to Salesforce attribute fields, send chat metrics into Salesforce, and turn on the Salesforce Revenue Dashboard.
Learn more about the full set up here.
How to Sync Salesforce Accounts
Rolling out the red carpet for target accounts is easy when using Salesforce and Drift together. Now, when a target account lands on your site, your sales team will be immediately notified so they can engage with them in a personalized way.
You’ll also be able to proactively reach out to your target accounts with a welcome message tailored just for them.
Here’s how it works:
![]()
Visit this help document to learn more about how to set up your Salesforce accounts.
Drift for Salesforce App
The Drift for Salesforce app syncs over 25 fields related to each conversation in Drift. The app powers reports and dashboards that we’ve pre-made for you. You can use these fields to create new reports alongside the rest of your Salesforce data.
To learn more about how to install the app, sync conversation data, use pre-made reports and dashboards, create Drift custom objects, and more head over to this help document.
Drift Insider Note
Did you know we have a class on the Drift for Salesforce App over on Drift Insider?
How to Use Our APIs
Below is a breakdown of what our JavaScript SDK and widget API can do for you.
Additional documentation and examples can be found in our developer docs here and in this help document.
If you’re a free user, you won’t have control over display settings through our app, but you can customize them yourself with these instructions. Here are a few things you can do:
JavaScript SDK
Mobile SDK
Help documents in this chapter:
Introduction to Playbooks
What’s in this chapter
What Is a Playbook?
Playbooks are crucial to Drift’s mission. If you’ve ever seen the personalized messages that pop up on Drift.com — that’s a playbook!
The mission of a playbook is simple: To engage website visitors in seconds with messages and interactions specific to each visitor and page.
With playbooks you can:
- Quickly qualify customer interest
- Share compelling content
- Schedule meetings with sales
And so much more.
We recommend building playbooks using our Conversational Framework.
Drift Insider Note
You can learn more about the Conversational Marketing Framework in this book.
Types of Playbooks
There are a few different types of playbooks that you can leverage to connect with your customers including:
- The Welcome Message Playbook
- Slider Message
- Email Capture
- Account-Based Playbook
- Fastlane Playbook
- Conversational Landing Pages
- The Bot Playbook
To begin building your first playbook, locate the Playbooks section in Drift, or click here. Clicking the blue button in the top right-hand corner gives you the options of different playbooks you can build.
Now let’s break down each type of playbook.
The Welcome Playbook
This playbook proactively greets your site visitors. If the site visitors choose to engage with the playbook, it will route them right to a rep and either connect them (when the team is online) or drop a calendar (when the team is offline).
We recommend using a welcome playbook to engage with a specific audience or if you’d like to connect a rep with anyone who lands on your site. This type of playbook does not have any qualification — it’s a fast track to sales.
![]()
There are two different types of welcome messages available: online and offline. If a visitor engages with an online playbook, Drift will open up a live chat conversation. With an offline playbook, it will serve up either a calendar to book a meeting (recommended) or an away message.
Often, this type of playbook can be confused with our Default Greeting message. You can check out the difference here.
Slider Message
The slider message playbook is a pop-over playbook that can be used to drive traffic to a specific page on your site.
Like all playbooks, the slider message can be targeted to specific users for onboarding tips, sales promotions, and everything in between. Often, it includes a call to action (CTA) that has three options: start a conversation, link to a URL, or schedule a meeting.
![]()
Account-Based Playbooks
Earlier, we talked about the importance of uploading accounts to Drift. Here, you’ll learn how to use those account lists in an ABM playbook.
If you’ve spent any time as an outbound sales rep, you know that prospecting accounts can be tedious. Even tracking the clicks on your emails can be frustrating when all you want to do is reach out to ask if they have any questions, or let them know you’re available in case they need anything.
This playbook notifies the account owner when a prospect lands on your site. On top of the notification, a personalized message will be sent to the prospect from the account owner, which provides a tailored and customized experience.
![]()
Conversational Landing Pages
There are two types of conversational landing pages you can use to connect with your buyers. The first is a classic conversational landing page and the other is Conversational Content.
A conversational landing page is a playbook on a custom URL that takes over the whole screen. With conversational landing pages, you can take potential customers from an ad directly to a conversation with your bot or team.
To learn more about building a conversational landing page, visit this help article.
A conversational content landing page allows you to embed a PDF right into your conversational landing pages. With conversational content, your team or bot can engage with people as they read your content in real time.
You can access conversational content landing pages by clicking Playbooks > Create Chat Playbook > Landing Page > Conversational Content. You can learn more here.
Fastlane Playbook
Fastlane lets your best buyers skip the form queue by referencing your tech stack data to qualify them in real time. No more forcing them to wait hours or days for follow-up.
After Fastlane qualifies your buyers, they are instantly routed to sales so they can jump straight into a conversation without ever leaving your website.
If your buyers are too busy for a live conversation, Fastlane lets them book a future meeting with their dedicated sales rep.
Fastlane is available on Advanced and Enterprise Drift plans.
Below are the steps that you’ll take to create the Fastlane playbook.
- Creating a Fastlane Playbook
- Installing the Fastlane JavaScript
- Mapping Form Fields to Drift Attributes
- Set Up Targeting Conditions
- Creating the Fastlane Bot Flow
Bot Playbook
Bot playbooks are the most popular type of Drift playbook. They give you the most flexibility to create a personalized experience for your site visitor based on where they are in their buying journey.
Using this playbook type, you can ask qualifying questions your customers can respond to freely or through button responses (designed by you).
With bot playbooks you can:
- Target specific types of site visitors or prospects
- Qualify leads automatically
- Connect leads to a human or have them book meetings to shorten your sales cycle
Routing rules can be used to ensure that the right people are added to the right conversations. This allows your sales team to handle inquiries and close deals, while your support team can interact with your existing customer base.
![]()
There are many use cases for this bot type. You can learn more bot playbook use cases and best practices while building them in our Conversational Marketing workbook.
To give you a sneak peek at what building a bot looks like, check out the video below. We’ll be teaching you how to build a bot in our stage 1 revenue acceleration guide.
Since bots are so flexible, the Drift team has created several templates for you. You can select which one you’d like to work off of based on your use case. If you’re feeling creative, you can also create your own bot from scratch. Learn more about the playbook marketplace below:
To read more about the different types of Playbooks that can be created in your Drift account, click here.
Drift Insider Note
To learn how to build a playbook, take our Playbook Basics Certification. By the time you have completed this certification, you will be ready to complete the playbook basics assessment and have six playbooks ready to go live in Drift. And more playbooks mean more conversations!
Help documents in this chapter:
Setting Up your Sales Team
What’s in this chapter
In this chapter, we will review how to set up your sales team for success. Your sales team will be in Drift every day booking meetings, chatting with potential buyers, looking at target account activity, and more. To get started, let’s review roles and how to add teammates.
Role Types
Sometimes, you don’t want everyone who has a Drift login to be able to access billing or change your widget settings. That’s why we have distinct roles with different permissions.
There are three roles (available in all paid plans): account owner, admins, and users.
Let’s start by reviewing the three role types.
What Is an Admin?
An admin user is able to access everything within Drift. This includes all conversations and all settings including billing, teammate management, security, and integrations.
Note: You can be an admin and not be an account holder; but you can’t be an account owner without also being an admin.
What Is a Chat User?
A chat user seat allows teammates to access conversations, Drift Meetings, and a limited view of playbooks and contacts. The types of conversations a teammate can access are determined by their conversation access level which is set when you assign a user to a seat. The three different access levels available are:
- All conversations
- Their conversations only
- Their conversations only and ones with no participants
Drift Insider Note
If you want to learn more about Sales Seat and how your organization can best utilize it, check out this Sales Seat Training course.
What Is an Account Owner?
The account owner is, by default, whoever set up the account. They are also the Drift team’s point of contact for billing concerns. The billing information in your settings, however, is static and will not change just because the account owner changes.
To transfer account ownership, select the account owner, then click the ellipsis in the popup and select Transfer Account Ownership. From here, you’ll be able to update the account owner.
User vs. Admin Permissions
Users have access to the following features:
Admins have access to the following features (not available to chat users):
- The ability to view or edit billing information
- The ability to change any of the settings related to the chat widget (styling, customization, hours, etc.)
- The ability to edit, add, or remove other users in Drift
- The ability to edit your Drift team directory
- The ability to export contacts in the contacts view
- Configuring any integrations settings
- Configuring any settings for tags, installation, routing, and saved replies
- The ability to edit any playbooks besides sales sequences they created
Enterprise User Roles
When you’re on our Enterprise pricing tier, you have two additional types of users: Playbook Editor and Reporting Only. These users are available to you via the invite team modal as well as the edit teammate side panel.
Playbook Editors have the ability to search conversations and modify and build bot playbooks. This role is ideal for marketing leads to be able to create playbooks that solve business needs without giving them access to other Drift settings.
Reporting Only users have the ability to search conversations, and view playbook overviews, site coverage, and revenue influence. This role is ideal for team leads who need to evaluate their reps in Drift without giving them access to other Drift settings.
Note for Enterprise users on the FY22 plan:
Playbook Editor and Reporting Roles have been replaced for the FY22 plan. In lieu of the two roles, you now are able to choose between the roles of Sales Rep and Marketer.
Sales Rep roles allow your agents to chat and video conversations, and includes sales and pipeline reporting, but not the ability to build a bot playbook.
Marketer roles give your agent the ability to modify and create playbooks, and have access to chat reporting, but not sales nor pipeline reporting, nor conversations.
Adding Users to Your Team
Adding a teammate to Drift is a quick two step process.
- Go to Settings > Manage teammates.
- Click the Invite teammates button and enter your teammate’s email address.
The invited teammate will then get an email inviting them to join your team.
![]()
When you are inviting your team members, you can now assign them as an administrator or a chat user.
Troubleshooting Invites
If a teammate is not receiving their invite email you can directly send them an invite link.
- On the manage teammates page click the Invitations tab.
- Click the Actions button next to the teammate you want to invite.
- Click Copy Invite Link and send the link directly to your teammate.
Check out our other doc on How to Delete a User from Your Team. To learn more about adding teammates, read this help document.
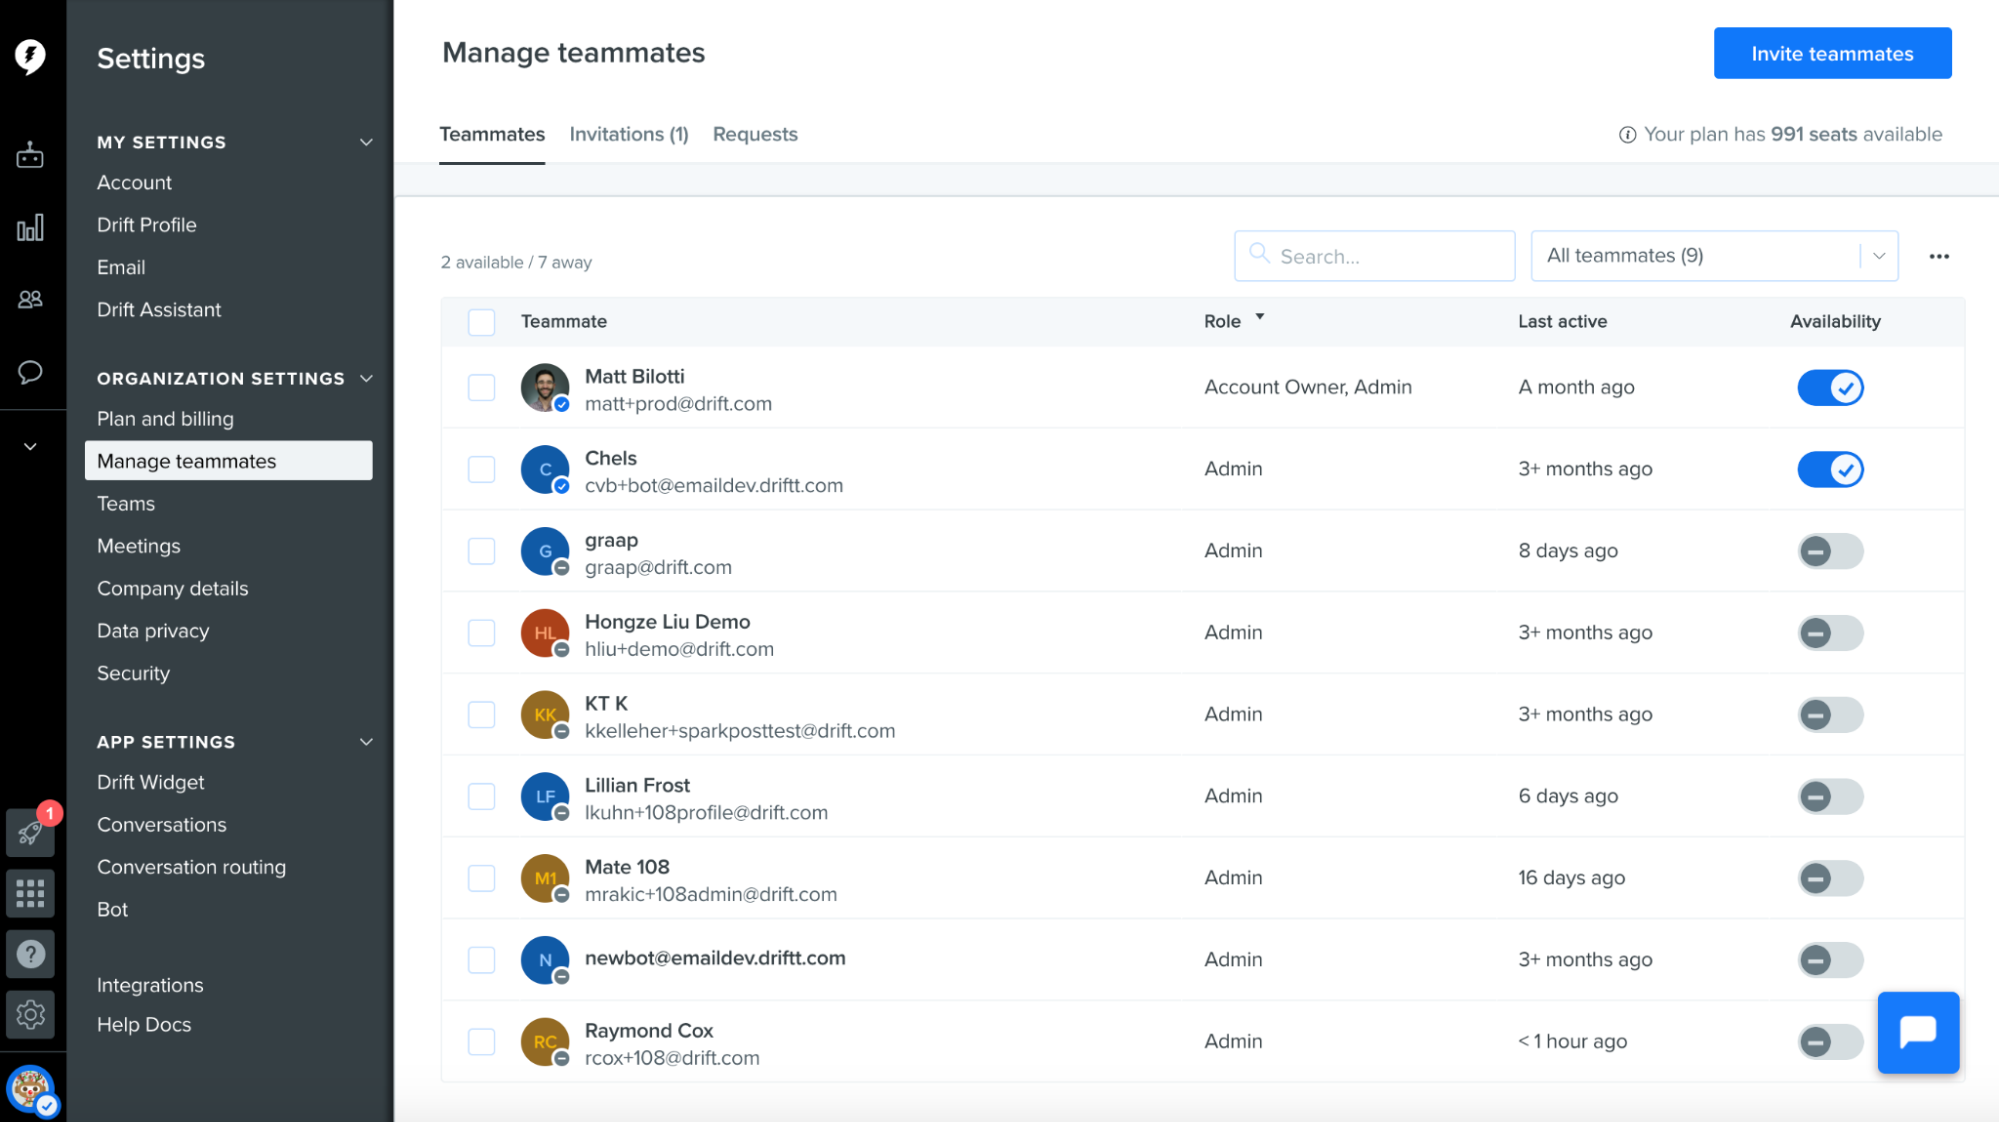
Managing Teammates
The manage teammates page shows you a list of all the active users that hold seats in your Drift account.
![]()
If you are an admin in Drift, the manage teammates page can be accessed by clicking on the settings icon which will open up directly to the manage teammates page.
Here you can toggle the availability for your agents, invite new teammates to Drift, and view a log of when users are toggling themselves online and offline.
How to Set Up “Teams”
Within your organization, you may have different teams of people to handle sales, support, or different territories. With Drift, you can set up teams so you can route to the appropriate team and manage their different working hours.
To set up teams, head to Settings > Organization Settings > Workspaces. Click into the workspace you would like to create a team in and click the Teams tab > Create Team. Please be aware you cannot create teams in your default workspace.
Next, you’ll name the team and use the dropdown to add your teammates. Once you’re done adding teammates, the team is ready!
![]()
Managing Your Teams
Once you create your team(s), you can click on the team and edit any settings, such as their business hours and timezone.
![]()
The most important settings for teams are the hours.
When you create a new team, they are defaulted to always being online. Use the Available Hours dropdowns to select the timezone and hours that they will operate in. You can also set these hours per day, weekdays only (Monday–Friday), or on weekends (Saturday–Sunday). Make sure to save your changes!
If you’d like to delete a team, click the “…” button at the top right of the team screen. You’ll be presented with a modal to confirm your team’s deletion.
Once you’ve configured your teams, you can target both your widget and playbooks based on the availability of your teams! For widget targeting based on a team’s availability, read this doc. For a playbook targeted based on a team’s availability, read this doc.
For further information on setting up and managing teams, read this help document.
Meetings
Ask any sales person what their ideal outcome from a conversation is and they’ll likely say booking a meeting with a buyer.
Drift makes it easy to drop a sales rep’s calendar with their availability so the site visitor can quickly book a meeting (while their intent is high).
We provide many avenues for your site visitors to book a meeting including directly from your Drift profile, within a chat playbook, through team availability, abandoned scheduling, sharing a direct scheduling link, or through our API.
First, your reps will have to connect their calendars. Drift integrates with your personal calendar, with support for Google and Outlook. The integration will automatically check your busy time slots and make sure that meetings never get double-booked for you.
Your team can learn more about connecting calendars in the video below and in this help document.
Meeting Types
We know not all meetings booked from Drift will have the same objective. That’s why meetings are customizable. You can choose the length of the meeting, location, and make group meetings to accommodate multiple teammates’ calendars.
You can have as many meeting types as you want. You can set each individual meeting length, meeting name, location and description in each individual setting.
For a full overview of meeting types, read this help document.
Default Meeting
Default meeting types will be used in playbooks when the bot drops a calendar. The length of the meeting is defaulted to 30 minutes, but you can edit this.
We recommend plugging your Zoom link or favorite meeting tool into the body of your meeting. Here is a help document on how to integrate Drift Meetings and Zoom.
![]()
Meeting types that aren’t your default type need to be manually linked or dropped in conversations, and you might want to change the name to something that would give context to your meeting, e.g. “Discovery Call” or “Product Demo.”
Custom Meeting
As mentioned above, custom meetings must be manually linked in emails or dropped in conversations by a rep.
You can create a custom meeting by going to Settings > Meetings > Create Meeting type. You’ll then be prompted to name your meeting. Again, we recommend naming your custom meeting something that would give context to your meeting.
You can then proceed to fill out the duration and location, add a conference link, and write a description.
This will be visible to your guests!
Group Meeting
With group meetings, you can invite multiple teammates to the meeting within the app, as long as they have their calendars set up in Drift as well. This is available on Premium or above plans.
Here’s how you set up a group meeting:
Start by going to your meetings tab, then click:
- New Meeting Type
- Group
- Choose a name for this type of meeting. (This will be visible to your customer.)
- Fill out meeting information such as length of meeting, meeting URL, location, and description.
- Under Add Teammates, pick from the dropdown menu or start typing a name to search for a teammate.
- Don’t forget to save!
![]()
You can learn more about group meetings and sending out group meeting links in this help document.
Meeting Distribution
When a prospect books a meeting through the bot, Drift knows it’s essential to select the right rep to handle the meeting request. For most sales teams, prioritization is done in one of two ways:
- Fair distribution is prioritized: Rep selections are made to ensure meeting requests are as evenly distributed as possible across a team or pool of individuals. Once the rep is selected, the prospect can choose a mutually agreeable time to meet.
- Speed and buyer experience is prioritized: The prospect selects the time that works best for them, after which a rep is chosen who shares that availability. If multiple reps are available, then the selection is made for fair distribution.
![]()
Drift defaults to the first option in a standard routing setup. Users on the Premium plan or above can choose to prioritize speed for any round-robin routing situations where a meeting is booked. Admins can turn this setting on by going to their organization’s meetings settings and checking the appropriate box.
For more information on prioritization of the round-robin calendar, read this help article.
Managing Conversations
Saved Replies
Answering the same questions and messages repeatedly can be time consuming, so we created saved replies that allow your reps to respond almost automatically to messages and shorten response time.
Drift admins can create and manage saved replies by going to Settings > App settings > Conversations > Saved Replies. You can also click here for easy access.
Once you click on New Saved Reply, a box will open where you can create a name for the reply and type the message that you want to send to your customers. For the reply name, make sure to write a unique and memorable title that can help you find your reply easily.
To insert a saved reply into a conversation, simply select the + button and select “Insert saved reply.”
You can learn more about saved replies in this help document.
Tags are a great way to conveniently organize your conversations.
You can locate your tags in your settings by going to Settings > App Settings > Conversations > Tags, or by clicking here.
![]()
Here, you can add a tag by clicking the “Create new tag” button.
Conversation tags are tags that are associated with a conversation. Conversation tags are used to label a conversation under a specific topic so you can follow-up and count the number of conversations associated with a topic.
You can apply a conversation tag from any conversation page in Drift by clicking the tag icon in your chat box or at a playbook level within a bot flow.
Reporting: We have a “How conversations are being tagged report” which can be found in conversation reports.
To learn more about tags and how to add them, read this help document.
Advanced Conversation Settings
Here are a few settings you may want to consider when setting up your sales team and Drift instance for success. You can find these in Settings > App Settings > Conversations > Advanced.
- Unfurling links
- Reroute conversations with no participants
- When a user comes online, we will reroute these conversations according to your lead routing rules.
- Limit chats per rep
- When a user is above their limit of open conversations, Drift will not route any new conversations to them so they can focus on their current ones.
- Read the help document here.
- Auto-close conversations after a period of inactivity
- Automatically close conversations where participants are unresponsive.
- Conversation session timeout
- Set the interval at which conversations are considered to be inactive. You can use session timeout to sync data to integrations.
- Read the help document here.
Inboxes
With Drift, you have the ability to manage and configure your inbox(es). This helps you direct all conversations from specific playbooks into a designated space.
For example, you may want to set up a sales inbox and a support inbox. Your sales-oriented playbooks will populate one inbox, while any support-related conversations will go to the other.
To add to or edit your inbox(es), go to Settings > App Settings > Conversations > Inboxes, or click here.
When you create a Drift account, we automatically set up a default inbox for you. This inbox will always be your default inbox and that status cannot be transferred. You can, however, edit the name of your inbox by opening the inbox in your settings.
![]()
To add a new inbox, simply click Create Inbox. You’ll be brought to a page where you can name the inbox and set up the public email address associated with it. The public email address will allow people to reply to conversations or contact you via email.
You can learn more about inboxes in this help document.
Help documents in this chapter
What’s in this chapter
We know it can be difficult to measure the ROI of a specific tool in your tech stack. That’s why Drift offers reporting within the application and hone in on what really matters — pipeline and revenue.
Check out this Drift Insider video on reporting within Drift.
We offer a series of reports that show you Drift performance including bot performance, overviews, meeting and conversation reports, conversation analysis, pipeline, and more. We’ll review these reports in this chapter.
Drift Dashboard
Let’s start with your Drift dashboard. As an admin, this will be the first thing you see when you open Drift. There are a few key reports on your Drift dashboard such as your overview, influenced by Drift, meetings report, and conversations report.
Drift Overview
In your Drift overview, we show you three key numbers that indicate the health of your account.
- Number of conversations that happened within a given timeframe
- Number of emails Drift captured within a given timeframe
- Number of conversation qualified leads (CQLs) that were marked within a given timeframe
The date range for this report is customizable.
Influenced by Drift
Next up, the influenced by Drift report. If you have Salesforce connected to Drift, you will also see a Salesforce revenue dashboard. For complete information on that and how it’s calculated, click here.
Meetings Report
We offer an overview report of the meetings your team has booked through Drift. The date range follows the filter you set at the top of the dashboard.
Along with a line graph showing the cumulative booked meetings within the timeframe, there’s also a table showing the top five members of your team in terms of meetings booked. To view the full report, click here.
Conversations Report
Lastly, your overview dashboard will give you a quick view of your conversation stats. You can see a graph of conversations per day, along with a heat map of when new conversations were started. To see the full report, click here.
You can read more about the Drift dashboard here.
Sales Results
For Drift users with Salesforce connected, you have the ability to dive deeper into data with multiple Salesforce reports. If you navigate to Reports > Sales Results you will find four reports: overview, pipeline, closed won, and sales cycle.
Sales Results Overview
The first report we’ll cover is the overview report. To view this report use the left-hand navigation pane to find Reports > Sales Results > Overview.
The overview report was created to provide a consolidated view of all three of our standalone sales reports (pipeline, closed won, and sales cycle).
This report and its underlying reports contain the following filters: date range, opportunity type, and sourced or influenced. Clicking on a card will take you to its corresponding report.
Learn more about how to use the Drift overview report in this Insider video.
You can also learn more about the overview report in this help document.
Pipeline Revenue Report
The pipeline revenue report shows you the Drift influenced and sourced pipeline opportunities and corresponding revenue amount. To view this report, use the left-hand navigation pane to find Reports > Sales Results > Pipeline.
![]()
To export any of the data, simply click the “Export CSV” button below the graph. The exported CSV contains more data fields than what is shown in the pipeline report table. If you would like to understand what each field means, continue reading. Otherwise please skip ahead to learn about the closed won revenue report.
To read more about the pipeline revenue report, check out this help document.
Closed Won Revenue Report
The closed won revenue report works exactly like the pipeline revenue report above. The difference is that this report only shows opportunities that are in the closed won stage in Salesforce.
To view this report use the navigation pane to find Reports > Sales Results > Closed won.
![]()
To read more about the closed won revenue report, check out this help document.
The Sales Cycle Report
The sales cycle report shows the average number of days between the date the opportunity was created and the closed won date. This will show you how fast you are closing opportunities over time.
To view this report use the navigation pane to find Reports > Sales Results > Sales cycle.
![]()
To learn more about the sales cycle report, read this help document.
If you are curious about how Drift calculated influenced and sourced by Drift, check out this help document.
Chat Playbooks Report
The playbooks report gives you key insights into how your playbooks are performing. Understanding this performance is crucial to increasing the number of conversations you’re having with site visitors, leads you capture, and meetings you book.
The playbooks report contains two main reports, chat and site coverage. To navigate to the playbooks reports, go to Reports > Playbooks.
You can learn more about the playbooks report page in this Drift Insider video.
Drift Insider Note
Check out this class on analyzing and optimizing bot performance in the Playbook Basics Certification.
Chat Playbooks Overview
To navigate to the chat playbooks reports, go to Reports > Playbooks > Chat. Here, you will find five available metrics. We’ll review those now.
Impressions
Impressions are the number of times a playbook was shown to a site visitor. Each time the content of a playbook is shown to a site visitor, it counts as a single impression.
![]()
The screenshot above is an example of a single chat playbook impression.
Sends
Sends are the number of visitor sessions where a playbook was shown. Sessions begin when a user first visits a page with the Drift widget and ends when the user has not visited a page for 30 minutes or at midnight UTC.
Conversations
Conversations show the number of conversations that were started as a result of the playbook.
When a site visitor engages with a chat playbook, they start a conversation. They can engage by clicking a button or sending a message in response to a bot playbook, providing their email via an announcement playbook, or by initiating a conversation from a welcome message playbook.
Here, you will also see the engagement rate. The engagement rate is the rate at which that playbook is starting conversations. It’s calculated by the number of conversations divided by the number of sends.
![]()
Emails Captured
Emails captured shows the number of emails captured within a conversation started by a playbook.
A site visitor can provide their email in a conversation with the bot through the email capture skill or by simply typing it into chat. When Drift recognizes that an email has been sent as part of a conversation, it will be represented as a single email capture by the playbook that initiated the conversation.
If a contact had an email associated with it prior to a conversation, it will not count as an additional capture if they provide their email again.
Email capture rate will be shown here as well. This is calculated by the number of emails captured divided by the number of conversations.
Meetings Booked
Meetings booked shows the number of meetings that were booked within a conversation started by a playbook.
![]()
Here, you will also find a playbook’s meeting booked rate. This is calculated by the number of meetings booked divided by the number of conversations.
View the chat playbook report here.
For more information on chat playbook reporting and individual playbook reporting, view this help document.
Site Coverage
The site coverage report allows you to see how many of your site visitors are shown a playbook and how many are not. This helps identify gaps in your playbook strategy and create playbooks for specific audiences.
![]()
You’ll find the site coverage report by navigating to Reports > Chat Playbooks > Site Coverage. From here, you’ll be able to see the average coverage for your site, the highest coverage page, and the lowest coverage page.
To learn more about site coverage, view this help document.
Conversations Report
The conversations tab includes four main reports: chats, meetings, calls, and conversation analysis. You can view the stats for all of your conversations by navigating to the Reports tab and clicking on an area to explore on the sidebar.
Chats Report
Drift allows you to see where the most conversations are started on your site, what time of day is most popular for chats, and much more in your chat stats dashboard.
![]()
In this report, you can find:
- Total conversations: how many conversations have occurred in Drift within a given timeframe
- Overall median conversation length: how long a conversation is from first open to close
- Time of day: when most chats are occurring
- Where are site visitors starting conversations: the most common URLs your site visitors are starting conversations from
- How conversations are being tagged: most frequently used conversation tags added by the bot or a teammate
Learn more about the chats report in this help document.
Meetings Report
The meetings report allows you to dive deeper into how many meetings are being booked, who is booking meetings, and which reps are booking the most meetings.
You can access the meetings report by clicking Reports > Meetings.
![]()
To learn more about the meetings report, visit this help document.
Calls Report
The calls report will show you how many calls have been made with the chat to call feature in the conversation view.
Not only can you see how many calls were made in a given timeframe but you can also see data on the caller such as name, company, the agent who received the call, and how long the call lasted.
You can access the calls report by clicking Reports > Calls.
Conversation Analysis
Conversation analysis lets you discover hidden insights that would otherwise be locked away in all of your customer conversations. With conversation analysis, it’s now easier than ever to understand your customer and improve the buying experience.
To access conversation analysis simply click Reports > Conversations > Conversation Analysis.
You can learn more about conversation analysis in the Drift Insider video below.
You can also learn more about conversation analysis in this help document.
The team performance overview provides insight into how your chat reps are performing.
Here you can find metrics that include the overall median response time, median response time, who is responding to the most conversations, and which agent has the highest conversation performance.
You can access the team performance overview by clicking Reports > Team Performance > Overview.
Help documents in this chapter