The Conversational Framework for Marketing
What’s in this chapter
What is the Conversational Framework for Marketing?
In the first Revenue Acceleration Guide, Stage 0: Getting Started with Drift, we reviewed the benefits of Conversational Marketing and how implementing it provides a better buying experience and accelerates revenue.
But how do you actually get started?
With Conversational Marketing, you can build and design conversations that make buying more enjoyable.
We do that in something called a playbook. Playbooks are automated workflows that you create to proactively engage site visitors and connect buyers with your sales team. We’ll review how to build a playbook later in this guide but, before you learn how to make a playbook, you need to understand the framework of a great conversation.
At Drift, we call this the Conversational Framework and it boils down to three main elements:
- Engage
- Understand
- Recommend
To put this into context, think about the last time you had a conversation with a sales rep.
If you had a bad experience, it was likely because the conversation felt impersonal. As if the sales rep was following a script and wasn’t taking the time to really understand who you were and what you needed.
If it was a great experience, they must have grabbed your attention, personalizing the conversation to fit who you are and the industry or department you work in. Once you were engaged in the conversation, they then acted as a trusted advisor — someone who understood the needs and challenges of your job. Lastly, they probably recommended an appropriate next step that took your needs into account.
We want to mimic that great experience in all of our playbooks. I’ll walk you through how we do this step by step.
Drift Insider Note
If you’re on the hunt for some playbook inspiration, we’ve put together a page to showcase the best chatbots being used by today’s Conversational Marketing and Sales leaders.
Engage: Ask and Acknowledge
Every good conversation starts with a great opener. In the chatbot world, we call that a hook.
Your hook should be personalized to the buyer and address their needs. It’s important that you recognize who the visitor is and where they are on your website so you can customize the hook accordingly.
What if, instead of filling out a demo form, there was a chatbot that offered to book you a meeting with a rep instantly? Or, if on the pricing page, a bot engaged with you by acknowledging that pricing can be confusing and offered to answer your questions? Like this example from Okta.com👇
![]()
Here are some potential hooks for a pricing page:
- Pricing can be confusing…want to chat through this with a teammate?
- We have custom prices for companies like [company name]. Interested in learning more?
- Hey there 👋 Have any questions about our plans or pricing? I can help!
Each of these hooks asks a question and acknowledges a pain or challenge your buyer may currently be experiencing.
You can also send targeted messages to those site visitors who seem most likely to buy, instead of waiting for them to initiate the conversation, like in the example below.
Whether you want to offer assistance to someone browsing your pricing page or check in on returning visitors, Conversational Marketing lets you proactively engage with the people who are most serious about buying your product.
You can learn more about the “engage” step in the Conversational Framework in the video below.
Understand: Learn and Respond
Once you’ve got someone engaged in conversation, you now have the opportunity to learn what the site visitor is looking for and respond with the appropriate journey for them.
This cuts out the hours, days, or potentially weeks a site visitor would normally have to wait to hear back from a sales rep.
As a matter of fact, customers just aren’t willing to wait that long for a response. According to a study from Lead Response Management, responding within five minutes gives you the best chance of qualifying a buyer. Wait even 30 minutes and your odds of qualifying the buyer drops by 100 times.
With Conversational Marketing, you can now qualify site visitors conversationally and in real time by making sure that someone is always available — whether that’s a bot or one of your sales reps.
Through conversation, you can figure out who is ready to chat with sales and connect them right away. You can also determine who isn’t a good fit for your solution and disqualify them in the early stages of the buying process.
Whether a visitor should be talking to support instead of sales or they’re just not ready to buy your product, you can make sure your sales reps are spending time with the buyers who are genuinely interested in buying.
Check out this Drift Insider video to learn more about the “understand” step in the Conversational Framework.
Recommend: Guide and Suggest
The last step in creating a great conversation is guiding the site visitor towards the next best course of action.
Using the information you learned in the previous steps, you can recommend a sales-focused recommendation, a nurture-focused recommendation, or a support-focused recommendation.
You would direct a sales-focused recommendation to site visitors who are target accounts or buyers with high intent. Here, you’ll be closing the sale with human to human interaction. You can recommend a chat with sales or instantly book meetings with qualified buyers.
Drift Tip: Read more about how sales reps can connect their calendars here.
If site visitors aren’t ready to talk to sales yet, you can recommend a nurture-focused recommendation. This can be a relevant ebook or product video.
Lastly, you may run into existing customers on your chatbot. If it’s a conversation that’s more suited for support, you can route in your support team to help answer the customer’s question. If your support team doesn’t have access to chat, you can use one of Drift’s support integrations, which will allow the site visitor to file a ticket.
You can learn more about the “recommend” step in the Conversational Framework in the Drift Insider video below.
The Conversational Framework is simple. You engage by reaching out and interacting with potential buyers, you understand their challenges and goals, and then you recommend the next course of action.
Blueprint Stage 1: Engage Website Visitors
What’s in this chapter
Blueprint Stage 1: Engage Website Visitors
Now you know what goes into a great conversation. But to actually roll out Conversational Marketing on your site, you’ll need a blueprint. In this guide, we’ll be covering stage one of the blueprint. Check out the Drift Insider video below for a quick overview.
Stage one of the blueprint involves engaging website visitors by acknowledging what page they are on and delivering a personalized experience.
Let’s say you’re searching for a new e-learning platform. After a Google search, you land on a webpage with a bunch of information about products, use cases, features, and customers. It’s a lot of information to take in.
But then, a chatbot appears. “Hey there,” it says, “Can I help you find something?”
You respond that you’re looking for a learning platform geared towards sales.
“Great,” the bot says. “You might want to check out our customer stories to hear from companies that rely on our platform to level up their teams. Can I interest you in a quick demo?”
You agree, and a few seconds later, you’re chatting with a sales rep. She gets you onto a call, shares her screen, and walks you through the product. The next month, you wrap up your research and decide to purchase a subscription.
That’s the first stage of Conversational Marketing: engaging website visitors.
Stage two takes this one step further and proactively targets potential buyers. We’ll cover stage two use cases in the next Revenue Acceleration Guide.
Before you jump into stage two, you’ll need to build a strong foundation. Your stage one playbooks need to cast a wide net — engaging everyone who lands on your website. To do that, you’ll need a blueprint.
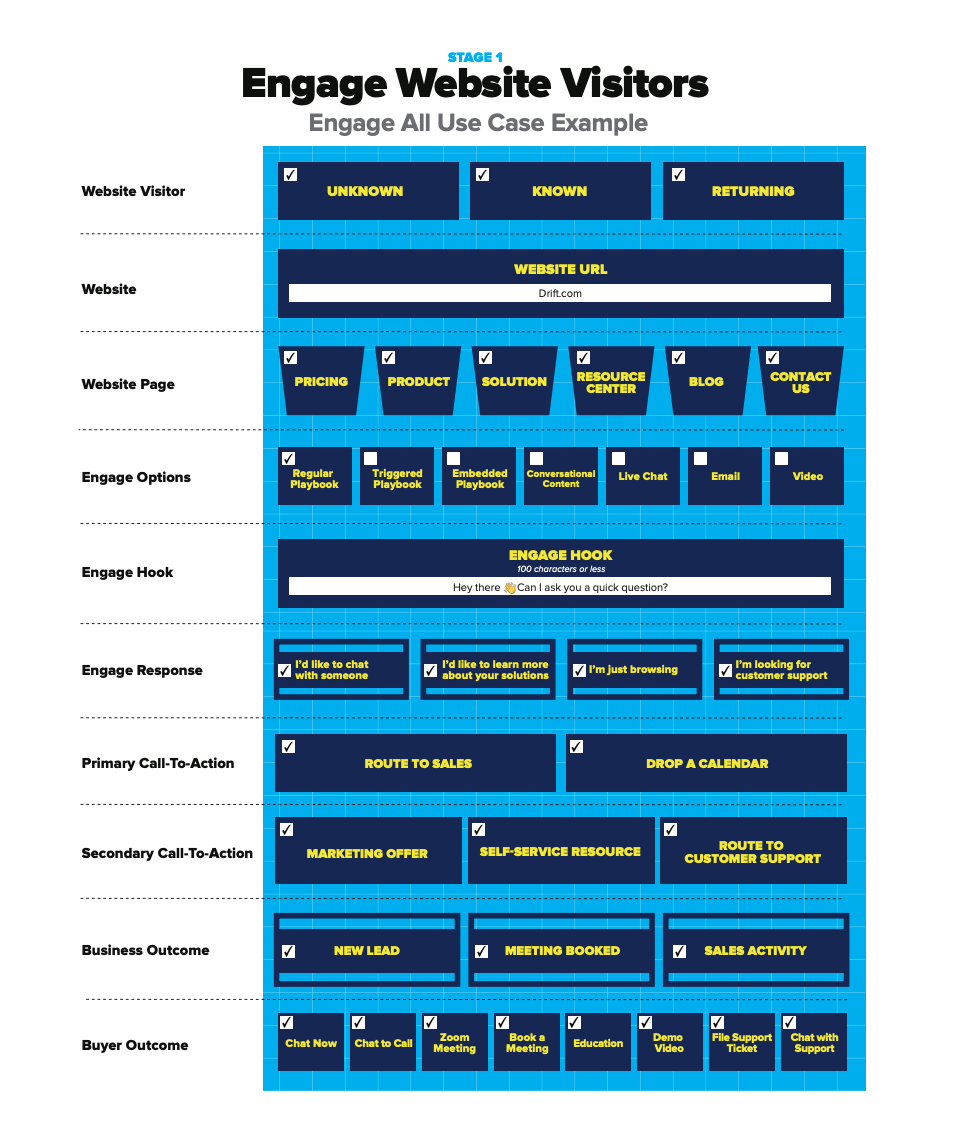
Engage Website Visitors Blueprint
![]()
The stage one blueprint is your guide to creating a great buying experience. Instead of a transactional relationship, you want your site visitors to have a personalized and enjoyable conversation.
This blueprint helps you identify the four Ws — who, where, what, and why — that you’ll need to design your conversations.
To help you along your Conversational Marketing journey, we’ve created the Engage Website Visitors template in our Conversational Marketing workbook. This template is your tactical roadmap for applying Conversational Marketing across your site. You can download the workbook here.
To create the conversational experience, you’ll need to tweak the template. Each tweak produces a different use case. For stage one, there are 11 of them in total. In the following chapters, we’ll review how to create a playbook strategy, the stage one use cases, how to build a bot playbook, how to use reporting to assess the ROI of your playbooks, and more.
Building Your Playbook Strategy
What’s in this chapter
The Engage All Playbook
The Engage All playbook is the core of your playbook strategy. It’s your go-to use case, and we recommend starting here.
There are a few reasons for this.
The Engage All playbook fires when a visitor doesn’t trigger a more targeted, higher priority experience, such as a visitor on the pricing page or someone whose been retargeted. This means the playbook will catch traffic across your whole website, giving all site visitors the opportunity to start a conversation.
In the Engage All playbook, you may not know who the site visitor is. Since you don’t know exactly what page they are on or what their intent is, this will be one of your largest playbooks — with multiple journeys for different personas and levels of intent.
This is the other reason we recommend starting with the Engage All playbook. Since this will be one of your largest bots, once you refine it, you can clone it and tweak it for other purposes, such as your pricing, blog, or demo pages.
Engage All Playbook Blueprint
Drift Insider Note
You can follow along and build your own Engage All Playbook in your Conversational Marketing Blueprint workbook.
Let’s start with the 4 Ws, starting with the “who.”
In the Engage Website Visitors blueprint, there are three main categories for who we are engaging with: unknown, known, and returning visitors.
The Engage All is your lowest priority playbook, meaning it’s catching all traffic that isn’t targeted by a higher priority playbook so we should check off all the boxes — unknown, known and returning.
Next up, the “where.” “Where” covers where you are engaging site visitors. Here, you should insert the domain you’d like to engage visitors from.
Now, the “what.” Here, you’ll choose the page you are engaging visitors on. Since this is the Engage All playbook, you will be engaging across all your webpages. For this, you’ll also be using a regular bot playbook. We’ll review playbook types in the next chapter.
Finally, the “why.” Here, you will map out why you are engaging your site visitor, looking at both buyer outcomes and business outcomes. In an Engage All playbook, you’ll want to check all outcomes.
With all of this, here’s your Engage All blueprint fully filled out:
Check out this Drift Insider video to learn more about how to apply the workbook template to the Engage All use case.
As you can see, the workbook helps map out how you can apply Conversational Marketing to engage anyone who arrives on your website. Now, let’s take a look at how the Conversational Framework fits into your Engage All playbook. To do this, we’ll use a real-life example from Zenefits.
Engage
The Engage All bot is designed for first-time visitors and visitors you are trying to learn more about. The Zenefits bot keeps the hook simple and acknowledges the visitor’s pain.
Here are a few other hooks that are great conversation starters:
- Hey there! Can I ask you a quick question?
- Hey, [insert company]! Can I help you find something?
- Want to know something cool?
- Hey [company name] What would you do with 40% more leads?
- Thanks for stopping by! Looking into [solution type]?
- Ready to take [solution tech] to the next level?
- Can I help you with your research?
- Hey there! Have any questions? We have humans available to chat now!
Drift Insider Note
Want more hook examples? Here are 33 bot hooks to improve your conversation rates and start more conversations.
Understand
This is an AI bot. That means the bot is able to respond not just to button-based responses, but also open text. It knows that the options offered might not cover the bases for every single visitor. This bot uses AI to understand why the site visitor is on the site today and what their pain points are.
Recommend
The bot recommends next steps based on what the visitor types into the open text field. The visitor asks about pricing and the bot is able to offer pricing plan info, while asking the visitor to share more information about themselves.
The Engage All use case is like a safety net. It catches all the website visitors who slip past other conversion points and more advanced Conversational Marketing use cases. So don’t be worried if its engagement rate is comparatively low.
A good benchmark to aim for is an engagement rate of between 1.8% and 2.2%. Any lower and you’ll want to change up your hook.
Once you’ve got visitors engaged in a conversation, expect an email capture rate of between 15% and 20%.
If your metrics are lower, it’s time to test and refine. Check your Conversation Flow report for points of friction. Try removing excess buttons, questions, and other obstacles to make the chat flow as frictionless as possible, and read our Email Capture Best Practices Guide for best practices based on top-performing email captures from our customers.
Once you’re all set with your Engage All playbook, it’s time to deploy the rest of your stage one playbooks.
Drift Insider Note
Check out more real-life examples of Engage All playbooks and more on Really Good Chatbots, a collection of best-in-class customer chatbot examples.
Engage Website Visitors Use Cases
There are eight main use cases in Stage One: Engage Website Visitors. We already went over the Engage All playbook. Now, let’s dive into the other seven use cases.
You can also check out this Drift Insider video which reviews the Engage Website Visitor use cases.
Book a Meeting
Want to help visitors skip the form and start talking to your team instead? Use this bot on your “contact us,” “request a demo,” or other form pages to improve conversions and have more conversations. Here’s the full Book a Meeting blueprint if you want to follow along.
Give your visitors a faster alternative to a form with one of these friction-removing hooks:
- Hey there 👋 Want to skip the form and chat with someone now?
- Want a quick demo on [insert product of interest]? We’ll keep it short and all about you!
- Psst…down here 👋 I can help you skip the form and book a demo now!
- What’s stopping you from getting started? I can help you set up time to chat with an expert👇
- Looks like you’re interested in [solution type]. Want to book some time to chat through your use case?
- Welcome back [company name]! Things must be getting serious 😏 Ready to connect with a [your company name] teammate?
Once you know they are the right fit for your solution, you can recommend a demo. If the site visitor isn’t ready to chat with sales yet, you can recommend a secondary call to action, like linking a demo video or relevant ebook.
Check out this Book a Meeting bot from Qualtrics.
Pricing Page
Pricing is an important part of any buying decision. The pricing page bot allows you to connect instantly with visitors who have high intent.
Whether your pricing is straightforward or customized, use one of these hooks to grab your visitor’s attention and direct them to the right resources:
- Hey there 👋 Have any questions about our plans or pricing?
- We have custom prices for companies like [company name or {your business}]. Interested in learning more?
- Pricing can be confusing…want to chat through this with a teammate?
- You’re back! 👋 Glad to see you’re checking out our plans. Need help finding the right plan for [company name]?
- Back to check out pricing? Things must be getting serious 😏 Want to chat through this with a teammate?
After engaging your site visitor with a hook that grabs their attention, you should understand why they’re checking out pricing and if they have any questions. Then it’s closing time, where you can recommend a meeting.
View the entire Pricing Page blueprint here and check out this real-life pricing page bot example from Gong.
Visitor Retargeting
Your site visitor came back to your site — that’s awesome! With the visitor retargeting bot, you can acknowledge that they’re back with a greeting designed specifically for them.
Try one of these hooks to get them back into the conversation:
- Hey there! Welcome back! Still wondering if we are a good match? Let’s find out.
- Hey there 👋 Welcome back! Are you ready to get started with [solution name]?
- Hey there 👋 Welcome back! Would you like to speak to a human right now?
- Looks like things are getting serious…want to speak to a human right now?
- Hey [account name] 👋 You’re becoming a regular around here. What brings you here today?
- Back again? I think I can help you!
- Hey 👋 Welcome back! Still not sure if you’re a good fit? I can help you!
- Hi 👋 Still deciding? Maybe I can help!
- Hi [company name]. Welcome back! Still trying to see out if we’re a good match? We are too! Maybe we could get to know each other better?
After engaging them with a personalized hook, understand why they are back on your site and guide them to the right resources. Then, recommend a chat with sales or send them some marketing content as a backup.
Check out the full Visitor Retargeting blueprint here and view a Visitor Retargeting example from Wyndham Hotels here.
Product & Solution Pages
Product and solution bots are a huge opportunity for you to start a conversation with a site visitor who is exploring how your product might solve their problems. Your bot can walk prospective buyers through the solution and illustrate how it would solve their current challenges.
Use one of these hooks to show a prospective buyer how your solution can solve their problems:
- Hey there 👋 Want to learn more about our solutions?
- Looks like you’re interested in [solution name], that’s great! Want to chat now?
- Hey there 👋 Want to make your life easier with [solution name]? Let’s talk with a human right now!
- Hi! Companies like [company name] are already using [solution name]! Ready to get started?
- Hey there 👋 It looks like you’re interested in [solution name]! How can I help you?
After engaging them with one of the above hooks, understand their current pain points and recommend a conversation with a sales rep who can walk them through the product in a demo.
Here’s the full Product & Solution blueprint. Want to check out a customer example? View this solutions page bot from Tenable.
Resource Center
Your prospective buyer is likely to come across many resources as they research your company. Give them a better experience with the resource center bot. In this use case, you can offer a fast track to content — offering a way around gating forms. Not to mention, you can use the bot to point visitors to your best content.
Try out one of these hooks to grab their attention:
- Want to skip the form and download the report now?
- Hey there 👋 Need any help finding a resource?
- Looks like you read our Demand Gen Guide…here’s an ebook I recommend next 👇
- Want a PDF copy of this ebook so you can save it and read it later?
After engaging the site visitor, understand what other kinds of content they’d like to see or if they have any questions about what they’ve read. Then, recommend a chat with sales or provide links to self-service resources.
Here’s a link to the Resource Center blueprint.
Blog
The blog playbook is a great way to engage site visitors reading your blog by inviting them to subscribe to your newsletter — without having to leave the page and go through a form.
Use one of these hooks to grab your site visitor’s attention while they’re browsing your blog:
- Hey there 👋 Interested in getting our content delivered right to your inbox?
- We have 10,000 [types of people] subscribed to weekly posts delivered to their inbox. Would you like to join them?
- Want to hear something cool?
- Want to stay up to date on the latest [insert company name] news?
After engaging the site visitor, understand what brought them to your website today and recommend a chat with sales or relevant content for them to read.
Here’s the Blog blueprint template and here is a blog bot example from Lessonly.
Landing Page 2.0
Landing Page 2.0 takes your average landing page and elevates it by adding a chatbot for visitors to engage with. For this use case, you’ll leverage a Drift Conversational Landing Page. We’ll review this type of bot and how to build it in the next chapter.
Here are a few hooks you can use as your site visitor is browsing your Conversational Landing Page.
- Hey there! Want to get the downloadable version of this [resource type]? I have it right here!
- Want to chat with sales about [insert asset topic]?
- Want to be notified when chapter two is ready?
- Hey there 👋 I can help walk you through the key points in this ebook!
After engaging the site visitor, understand their intent and if they have any questions. Then, recommend routing in a sales rep who can help the visitor with any questions as they read. Get the Landing Page 2.0 blueprint here.
Drift Audiences
You now know our most popular Engage Website Visitor use cases. But where to begin? Enter: Drift Audiences.
Drift Audiences allows you to unify all relevant data from your tech stack into one place so you don’t have to transfer data between an exploding stack of website targeting tools.
You can use Drift Audiences to:
- Figure out where to take action and drive more pipeline.
- Increase the ROI of all your marketing channels.
- Deliver a VIP-level website experience for your target accounts.
Watch this video to learn more about what Drift Audiences is, how it can help you, and best practices for incorporating this data into your playbooks.
Drift Audiences is available on all Enterprise plans.
How Do I Use Drift Audiences?
Drift Audiences will show you a breakdown of:
- Site visitors who were shown a playbook, conversations started, emails captured, and meetings booked
- Target benchmarks based on composites of customers
- Trending data (week over week metrics) for a 12-week period
You can filter your audiences by:
- Top audiences (default)
- Website (domain, high-intent pages, top URL)
- UTM parameters (campaign, content, medium, source, term)
- Drift Intel (country, employee range, industry)
- Target accounts/lists (6Sense, Marketo, non-target, target)
- Custom Salesforce account picklist data
Using Audiences in Stage One: Engage Website Visitors
In stage one, your playbook use cases are based on what page a site visitor is on. To determine which playbook to build after your Engage All playbook, we recommend using Drift Audiences’ Website section. The Website section includes filters by domain, high-intent pages, and top URL.
![]()
Once you filter by domain, high-intent pages, or top URL, you can then view metrics for that specific audience — like the number of visitors in a given time period, number of visitors shown a playbook, number of conversations started, number of emails captured, number of meetings booked, and number of visitors not shown a playbook.
To determine your next build after Engage All, take a look at your high-intent pages. Your most viewed high-intent page (like a demo request or contact us page) should be your next build. After that, take a look at your top URLs and make sure those have a dedicated playbook.
You can then create a playbook or clone an existing playbook based on a given audience. Drift Audiences also allows you to see how your existing playbooks are performing for a given audience. Read about that and more in this help document.
Help Documents in this Chapter:
Types of Playbooks
There are a few different types of playbooks that you can leverage to connect with your customers including:
- The Welcome Message Playbook
- Slider Message
- Email Capture
- Account-Based Playbook
- Fastlane Playbook
- Conversational Landing Pages
- The Bot Playbook
To begin building your first playbook, locate the Playbooks section in Drift, or click here. Clicking the blue button in the top right-hand corner gives you the options of different playbooks you can build.
Now let’s break down each type of playbook.
The Welcome Playbook
This playbook proactively greets your site visitors. If the site visitors choose to engage with the playbook, it will route them right to a rep and either connect them (when the team is online) or drop a calendar (when the team is offline).
We recommend using a welcome playbook to engage with a specific audience or if you’d like to connect a rep with anyone who lands on your site. This type of playbook does not have any qualification — it’s a fast track to sales.
![]()
There are two different types of welcome messages available: online and offline. If a visitor engages with an online playbook, Drift will open up a live chat conversation. With an offline playbook, it will serve up either a calendar to book a meeting (recommended) or an away message.
Often, this type of playbook can be confused with our Default Greeting message. You can check out the difference here.
Slider Message
The slider message playbook is a pop-over playbook that can be used to drive traffic to a specific page on your site.
Like all playbooks, the slider message can be targeted to specific users for onboarding tips, sales promotions, and everything in between. Often, it includes a call to action (CTA) that has three options: start a conversation, link to a URL, or schedule a meeting.
![]()
Account-Based Playbooks
Earlier, we talked about the importance of uploading accounts to Drift. Here, you’ll learn how to use those account lists in an ABM playbook.
If you’ve spent any time as an outbound sales rep, you know that prospecting accounts can be tedious. Even tracking the clicks on your emails can be frustrating when all you want to do is reach out to ask if they have any questions, or let them know you’re available in case they need anything.
This playbook notifies the account owner when a prospect lands on your site. On top of the notification, a personalized message will be sent to the prospect from the account owner, which provides a tailored and customized experience.
![]()
Conversational Landing Pages
There are two types of conversational landing pages you can use to connect with your buyers. The first is a classic conversational landing page and the other is Conversational Content.
A conversational landing page is a playbook on a custom URL that takes over the whole screen. With conversational landing pages, you can take potential customers from an ad directly to a conversation with your bot or team.
To learn more about building a conversational landing page, visit this help article.
A conversational content landing page allows you to embed a PDF right into your conversational landing pages. With conversational content, your team or bot can engage with people as they read your content in real time.
You can access conversational content landing pages by clicking Playbooks > Create Chat Playbook > Landing Page > Conversational Content. You can learn more here.
Fastlane Playbook
Fastlane lets your best buyers skip the form queue by referencing your tech stack data to qualify them in real time. No more forcing them to wait hours or days for follow-up.
After Fastlane qualifies your buyers, they are instantly routed to sales so they can jump straight into a conversation without ever leaving your website.
If your buyers are too busy for a live conversation, Fastlane lets them book a future meeting with their dedicated sales rep.
Fastlane is available on Advanced and Enterprise Drift plans.
Below are the steps that you’ll take to create the Fastlane playbook.
- Creating a Fastlane Playbook
- Installing the Fastlane JavaScript
- Mapping Form Fields to Drift Attributes
- Set Up Targeting Conditions
- Creating the Fastlane Bot Flow
Bot Playbook
Bot playbooks are the most popular type of Drift playbook. They give you the most flexibility to create a personalized experience for your site visitor based on where they are in their buying journey.
Using this playbook type, you can ask qualifying questions your customers can respond to freely or through button responses (designed by you).
With bot playbooks you can:
- Target specific types of site visitors or prospects
- Qualify leads automatically
- Connect leads to a human or have them book meetings to shorten your sales cycle
Routing rules can be used to ensure that the right people are added to the right conversations. This allows your sales team to handle inquiries and close deals, while your support team can interact with your existing customer base.
![]()
There are many use cases for this bot type. You can learn more bot playbook use cases and best practices while building them in our Conversational Marketing workbook.
To give you a sneak peek at what building a bot looks like, check out the video below. We’ll be teaching you how to build a bot in our stage 1 revenue acceleration guide.
Since bots are so flexible, the Drift team has created several templates for you. You can select which one you’d like to work off of based on your use case. If you’re feeling creative, you can also create your own bot from scratch. Learn more about the playbook marketplace below:
To read more about the different types of Playbooks that can be created in your Drift account, click here.
Drift Insider Note
To learn how to build a playbook, take our Playbook Basics Certification. By the time you have completed this certification, you will be ready to complete the playbook basics assessment and have six playbooks ready to go live in Drift. And more playbooks mean more conversations!
Help documents in this chapter:
How to Build a Bot Playbook: Targeting and Priority
What’s in this chapter
In the next two chapters, we’ll walk you through how to build our most popular playbook type, the Bot Playbook.
In this chapter, we’ll walk you through how to build our most popular playbook type, the Bot Playbook.
Drift Insider Note:
To learn how to build a playbook, take our Playbook Basics Certification. By the time you have completed this certification, you will be ready to complete the playbook basics assessment and have six playbooks ready to go live in Drift. And more playbooks mean more conversations!
Creating a Bot Playbook
To begin building your first playbook, locate the Playbooks section in Drift, or click here. Next, click the blue button in the top right-hand corner, which gives you the options for bot/live chat or landing page. For a bot playbook, click bot/live chat.
Next, you’ll be brought to our playbook marketplace where you can choose a template of a given use case or the option to build a bot from scratch.
You’ll then be prompted to name your bot.
Drift Tip: We recommend choosing naming conventions for your bots. Many customers use Region_Language_Bot Type. For example, EMEA_EN_Pricing or APAC_JPN_Contact Us.
Now you’re ready to start creating your bot experience. There are two key components to building a bot: targeting and the flow builder. We’ll review them both in this chapter.
Targeting
In chapter three, we reviewed the Engage Website Visitor use cases. In order to get that messaging to the right people, we’ll need to use targeting.
Targeting determines which playbook will fire by determining if the site visitor meets the set of criteria you created for a playbook.
Check out this Drift Insider video to learn the basics of audience targeting.
There are a few types of targeting so you can make sure you’re getting the right message to the right audience.
Website Targeting
Website targeting includes:
- URL: When the visitor is on the URL selected in this targeting step, the playbook will be displayed. There are a few ways to target by URL, including “is/is not any of,” and “contains/does not contain.”
- URL Path: This is the /path that displays after the core URL (drift.com/pricing).
- URL Host: This is the subdomain or core domain of the URL (drift.com/pricing).
- URL Query Param: This is any query parameter within a URL (drift.com/pricing/?utm_medium=cpc).
![]()
For Engage Website Visitors use cases, you will mostly be focused on using URL and URL Path.
Drift Targeting
- Drift Online: Target based on whether your Drift account is online or offline
- Outbound Session: Target based on whether or not the session is outbound
- Outbound Rep: Target based on the prospect’s outbound sales rep
- Targeted Account: Target based on whether or not the account is a direct target
- Team Status: Target based on whether or not one or more of your teams is online/offline (Premium plans and above)
- Contact Segment: Target or exclude one or more of your contact segments
- Account Segment: Target or exclude one or more of your account segments
![]()
Marketo Targeting
- Marketo List: Target one or more of your imported Marketo Lists (Premium plans and above)
6Sense Targeting
- 6Sense Segment: Target one or more of your imported 6Sense segments (Premium plans and above)
Demographic Targeting
- Country: Target by country
- US State: Target by states in the United States
- Canadian Province: Target by Canadian Province, e.g. Ontario
- IP Address: Target by a set of IP addresses
- Zip Code: Target based on global zip codes
Visitor Behavior Targeting
- Referrer: This is the URL that refers the visitor to the page they’re on now (e.g. google.com).
- Number of site visits: The number of times a user has visited your site (sessions, not page views).
- Number of days since last visit: If the visitor last visited your website a specific number of days ago, the campaign will display.
- Device: If the visitor’s browser matches the criteria set, they’ll see the campaign. The options here are mobile, desktop, or tablet
- Seconds on page: After your visitor has been on the page for a certain number of seconds, you can have a message display. This will delay the message from popping up for the allotted time.
- Seconds on site (in seconds): Similar to “seconds on page” but measured from the start of the visitor’s session and independent of the amount of time that is spent on any given page.
- Scroll percentage: After a visitor scrolls X percent of a page, you can have your message display.
- On exit intent: This triggers when a user’s cursor leaves the window on the top half of the screen, usually indicating they intend to change browser tabs or close this tab/window. The user must be on the page for at least five seconds for exit intent to work.
- Cookie: Hide or display your widget or playbook to users who have or don’t have a specific cookie attached to them.
Firmographics Targeting
Targeting based on firmographics is available to our users on the Premium (formerly Company) plan and above.
- Employees: Number of employees in a company
- Revenue: Annual revenue for a company (public companies only)
- Industry: Industry classification of company
- Domain: Company domain associated with person’s employer
- Name: Name of company
Any targeting with Drift Intel is contingent on being able to identify the visitor’s IP in the database. If there is no match, no other playbook display conditions will apply.
DriftLinks Targeting
DriftLinks are hash identifiers that inform Drift which playbook to fire. If you append them to any URL on your site, your playbook will fire.
The most popular use case for a DriftLink is launching a bot playbook when a site visitor clicks a button or link on your site. For example, if you go to drift.com and click the Get a demo button or if you click on the widget icon in your account, a playbook will fire via DriftLinks.
![]()
To create a unique DriftLink, head to the DriftLink tab along the top navigation bar in your playbook. In the composer, select a unique tag to use for your DriftLink.
![]()
If you only want your playbook to fire with this DriftLink, check the box that says “Only fire when #DriftLink is present.” Otherwise, your bot playbook will also use the targeting conditions you’ve set in “Audience.”
Keep in mind that, should you change your DriftLink after deploying your playbook, any links you’d previously shared with the prior DriftLink will no longer fire the playbook.
For more detailed info on DriftLinks, check out our help doc here.
Advanced Targeting Settings
In addition to the targeting options listed above, we also have advanced targeting settings that use cookies or JavaScript to target visitors based on their behavior.
- Visitors with recent conversation history: Choose to target site visitors who have (or haven’t) chatted with you in the last seven days. This targeting type requires Drift to know the email of the site visitor.
- Sales Engaged: Choose to target visitors who are (or aren’t) currently engaging with your team, either through email or booked meetings. This targeting type also requires Drift to know the email of the site visitor.
- Identified by your website: This targeting type uses JavaScript and a unique user ID to identify and target known (or unknown) site visitors. For more information on how to use JavaScript for this type of targeting, please see our dev doc on user identification.
![]()
Combining Conditions
You can now combine conditions to target audiences with your playbooks. For example, to create a playbook that shows to US site visitors on the pricing page, I would combine the conditions “URL” and “Country”.
Using “and” will make a condition set, which will tell Drift each condition has to match for the playbook to show. “Or” conditions will tell Drift that either of those conditions must be met to have the playbook show.
Choosing Playbook Display Frequency
After setting the targeting conditions, you’ll want to set how often your playbook is shown. Simply scroll down and select the appropriate option button. You can also select the percentage of customers who will see your bot.
![]()
If you choose On every page load, the bot will fire every time the page is loaded.
Note: If someone starts a conversation and they refresh the playbook, they will lose the conversation and the playbook will start over.
If you choose the Until they interact, once per session option, the playbook will only fire once every 30 minutes from time of interaction. (Interacting includes opening the content or dismissing it.) After 30 minutes, the visitor will be eligible to see that content again.
Drift Tip: Until they interact, once per session is our recommended option.
If you choose the Until they interact, then hide it option, the visitor will not be eligible to see the playbook until they’ve interacted with it. (Interacting includes opening the content or dismissing it.)
Additionally, you can choose to customize what percentage of targeted visitors are shown the playbook.
If you choose 100% of targeted visitors, every targeted visitor will see the playbook.
If you choose a custom percentage, you can select the amount of visitors that will see the playbook via the pulldown on the same line. Your choices are 5%, 10%, 25%, 33%, 50%, and 75%
We recommend you choose 100% of targeted visitors, unless you’d like to start with a smaller audience — in which case you can choose a custom percentage.
You can learn more about playbook targeting in this help document.
Audience Estimator
The playbooks’ Audience Estimator shows a potential estimate of playbook reach. This shows data from the previous week, Sunday to Sunday.
In Stage One: Engage Website Visitors, you should be looking to cover a broad audience as opposed to a specific one. The broader your audience is, the more conversations you’ll have.
![]()
Chat Playbook Priority
You have the ability to prioritize the order in which your playbooks are shown to your site visitors. Playbooks with the same targeting conditions will fire in order of priority.
Here’s how we recommend you order your playbooks:
- Outbound welcome message playbooks
- ABM welcome messages
- All other ABM playbooks
- Firmographic and behavior targeting (industry playbook, paid ad playbooks)
- More specific URL targeting (demo, pricing, contact us)
- More general targeting (engage all)
Here’s a breakdown of how Drift will consider firing playbooks based on targeting and priority.
Help Documents in this Chapter:
Creating a Bot Playbook: Flow Builder
What’s in this Chapter
Now that you’ve set your targeting and priority, it’s time to create your bot in the flow builder. Here, you’ll get to put the Conversational Framework you learned in chapter one into action.
To get started, check out this Drift Insider video walking you through building an Engage All playbook in the flow builder.
There are a few components to bot playbooks, including:
- Question Nodes
- Responses
- Buttons
- Keyword Groups
- Triggered Actions
- Message Nodes
- Personalization Tokens
- Conditional Branching
- Skills and Goals
We’ll review all of these components and how to navigate them in this chapter.
Message Node
Message nodes can be used to greet your site visitors and add more information to the flow. They do not have any responses attached to them. You can format the text using bold, italics, underline, and numbered/bullet list. You can also add hyperlinks, emojis, pictures/GIFs, and personalization tokens.
Question Node
Question nodes allow you to engage your site visitor and understand why they are on the site. You can also use question nodes to ask your site visitor qualifying questions to make sure they’re a good fit to chat with your sales team. Remember to keep your qualifying questions short and simple.
To add a question node, click the + icon and select Question.
Next, within the question tab, you can edit the copy of the question. You’ll be able to preview it on the right side of the window.
Then, hit save and close.
Drift Tip: The very first question node in your flow builder will be your bot hook, which is the text that is previewed to the site visitor.
Responses
Question and message nodes are how your bot communicates with your site visitor. Responses are how your site visitors talk back to your bot.
We provide three response options: all responses, buttons, and keyword groups.
All Responses
“All responses” refers to freely typed responses. These can be great when you’re asking qualifying questions. For example, you might use “All responses” when asking, “Let’s get to know each other — what’s your name?”
Buttons are a great way to guide your site visitors by giving them specific options to choose from.
To add a new button, go to the Responses tab and click on the + button under the Buttons section.
Within the Button text, you can edit the copy of your button.
You can then add a bot response, which is a short message answering the button response.
You can include as many button responses as you’d like, but we recommend keeping it at two to three responses.
To add more responses, click on All Responses. You’ll be brought back to the responses tab. Then, repeat the above steps.
You can also add a new button response right from the builder without clicking into the question node.
Click the + icon within Visitor responses and click Add button. This will automatically bring you to the window to add a new button.
Want to switch up the order of your responses? Hover over the three horizontal lines next to the button and drag and drop it into the position you want.
You may not want to give site visitors the option to freely type a response to your question. To keep your bot to button responses only, scroll down to Advanced options and choose “With buttons only” in the “How can visitors respond to this question” field. This will automatically remove the option for keyword groups and the default All responses.
![]()
You can also apply a triggered action when a site visitor responds with a button response.
The actions include:
- Mark as CQL (Conversation Qualified Lead): Qualify or disqualify leads using CQL scores. More about CQLs in this article.
- Set lead stage: Tag the site visitor with a specific lead stage to mark what point of the buying process they’re in! Check out this article about lead stages.
- Apply contact attribute: Save a static value to a Drift attribute or custom attribute for the contact record. This is attribute mapping on a specific response-level. See Mapping Responses to a Contact Attribute below.
- Tag conversation: Apply a tag to the conversation which you can use to filter your live chat inbox. More about conversations tags here.
![]()
Finally, once you’re done creating your button responses, make sure to save and close!
Keyword Groups
In addition to button responses, keyword groups allow your site visitor to freely type their own responses while helping you identify what they’re typing so you can take action and direct the conversation.
Note that in order to use keyword groups, you need to allow visitors to respond “With buttons or text” in the “How can visitors respond to this question?” field.
To add a keyword group, navigate to the Responses tab and click the + button under Keyword groups and choose New keyword group.
![]()
You have three options for keyword recognition, and we define them as follows:
- Contains: Any part of the keyword is included in the typed response (e.g. the keyword is “art,” but the visitor types in “start”).
- Equals: The typed response exactly matches the keyword (e.g. the visitor types in “start” and the keyword is “start”).
- Similar to: We use natural language processing to match the site visitor’s intent (e.g. the keyword is “start” and the site visitor types in “let’s get started”).
Next, type in the keywords and phrases that you want to include in your keyword group. Use Tab or a comma (,) to add another keyword or phrase. Too many words and phrases to type out? No worries, you can copy and paste them from a spreadsheet into the textbox.
Once you save a keyword group, you can reuse it in response to other question nodes.
To do this, within the Responses tab, click the + button under Keyword groups and choose Saved keyword group.
Mapping Responses to an Attribute
Mapping responses to contact attributes, whether it’s a Drift or custom attribute, allows you to save information about a site visitor within their contact record. You can then use these attributes in other areas of Drift, such as playbook targeting or syncing to a CRM like Salesforce.
There are two ways to map attributes from question responses: general response-level and specific response-level.
General Response-Level Attribute Mapping
In general response-level attribute mapping, whatever value the site visitor responds with, whether it’s a button or a freely-typed response, will be mapped over to the specified attribute.
Within the Responses tab of the question node, check the box for “Save all visitor responses to an attribute on their contact record.”
Then, choose the attribute to map to. If you don’t see an attribute you want to map to, you can create a custom attribute as outlined in this article.
Now that you’ve chosen which attribute to map to, click Save and close.
Specific Response-Level Attribute Mapping
For specific response-level attribute mapping, you can map over a static value to the contact attribute based on the site visitor’s response (be it button, keyword group, or freely-typed).
To do this, first choose which response to map.
Within the Responses tab, click on the specific response (button, keyword group, or all responses) that you want to map.
Then, enable attribute mapping at the specific response-level.
Within the Triggered actions section, check the box for “Apply contact attribute.” Finally, choose the attribute to map to and assign a static value.
Once you’re done mapping the attribute, click Save and close.
Building a New Path
Button responses help us understand the intent of site visitors. Once we know their intent, we can create personalized paths that help solve their current needs.
To build a new path, click the + icon next to the set of responses after your question. You’ll be able to build this new path out with questions, skills, and messages.
![]()
You can continue adding paths that guide the site visitor. Eventually, you will get to the “recommend” section of the Conversational Framework where you’ll want to recommend chatting with sales, chatting with support, or sending a relevant piece of content. To achieve this, you’ll want to use skills and goals.
Skills and Goals
With skills, your bot takes the burden of identifying, qualifying, and routing. To add a skill, click the + icon on any branching line, hover over “Add skill,” and you’ll see a list of the available skills pop out. Select one, and it will be added to the end of the branching line.
There are a few types of skills you can use in your bot.
Email Capture Skill
You can use the email capture skill for a variety of use cases, such as with an event registration bot, after sending content, or before connecting a site visitor with sales.
In the Setup tab, you’ll find:
- How should the bot ask for an email?
- How many times should the bot ask for a valid email address?
- Once, two/three/four times
- If the site visitor enters an unwanted or invalid email, the skill repeats
- Which types of email addresses are unwanted?
- Spam domains (from an outside source of common spam domains)
- Non-business email (You can add other domains.)
Book a Meeting Skill
With the Book a Meeting skill, you can drop a rep’s calendar so site visitors can book a meeting with them. Find more details on this routing in the Book a Meeting Skill section in our Routing documents.
A few things to keep in mind:
- Drift needs an email to book a meeting so, if it’s unknown at the time of the Book a Meeting skill, the bot will automatically ask.
- We suggest having an email capture skill before so you can filter out unwanted emails and customize how you ask for the email.
- In the Book a Meeting skill, you can allow visitors to leave meeting notes.
Phone Capture Skill
The phone capture skill allows you to easily ask for and collect a site visitor’s phone number.
In the Setup tab, you’ll find:
- How should the bot ask for a phone number?
- How many times should the bot ask for a valid phone number?
- Once, two/three/four times
- If the site visitor enters an invalid phone number, the skill repeats
- What’s the default phone country code? (Choose a country code or allow all numbers.)
Route Conversation Skill
The route conversation skill allows you to route a sales rep directly into the conversation with your site visitor in real time.
Learn more about how to configure routing rules in our first Revenue Acceleration Guide: Getting Started with Drift or in this help document.
Reordering Your Paths
To easily move a question or skill to a new position, simply click and hold to drag and drop the node into its desired position.
![]()
If you add a button response to the wrong path, you can easily drag it into the correct position. You’ll see that an empty path state is created but the subsequent nodes in that path are retained.
While your draft will save, you won’t be able to publish changes to a playbook with an empty path and you’ll see a red error appear. Click into the error to get information on where the error is. Resolving the error will allow you to publish your changes.
Conditional Branching
Conditional branches allow you to create paths based on a condition, such as your team being online or offline. You can create conditional branches based on any of the targeting conditions you set within Drift Audiences.
To create a conditional branch, click the + icon, select Add skill, then select Conditional Skill. You’ll see a conditional skill node appear in your flow with outputs below it.
![]()
Click on the pre-filled Condition 1 to edit. You’ll see Add a group where you can add any and all conditions you’d like. Then, name the condition by clicking on the condition’s name and click Save.
Here’s an example of adding the “Drift is online” condition, naming the condition, and seeing it appear in the builder.
To add subsequent conditions, go back into the conditional branching node, click the + icon, and enter your desired conditions. Name and save your condition set and you’ll see it added in the Outputs section.
You can then build out a path using the same methods as described in the “Building a New Path” section.
Conversation Status at the End of Bot Flow
Each time you add a new path, you’ll see a new conversation endpoint labeled “End of Bot Flow” and a “Conversation status” box. Click on Conversation status to change the end behavior.
![]()
You’ll see three options:
-
-
- Use this option when you want to keep routed conversations open so they show up in the rep’s conversation view.
- Auto-close conversation, but allow site visitors to chat back in
-
-
- With this option, conversations will be closed within the conversation view, but the site visitor can reopen the conversation.
- Use this option in paths where a site visitor hasn’t been connected to a rep, but they are qualified.
- Permanently close conversations; don’t allow site visitors to chat back in
-
- The conversation will be closed within the conversation view and the composer will be greyed out for site visitors.
- Use this option to end a conversation with an unqualified site visitor.
A/B Testing Your Playbook
A/B testing your playbook is a great way to ensure you’re interacting with your site visitors in the best and most engaging ways.
To get started, click the “Create A/B test” button.
![]()
This will split your playbook into two flows: flow A, the control flow, and flow B, the test flow. Once you click “create,” your playbook will look like this:
Your targeting will remain the same as any other playbook. Once your condition is set, any visitor that matches the criteria will be divided in half. Half the visitors that meet your targeting conditions will be shown bot flow A, while the other half will be shown bot flow B.
Your A/B test playbook flows won’t be live on your site until you initiate the test. Click the “Start A/B test” button at the top of the page.
If you want to make any edits to one of the bot flows or you know which one you would like to use, click the “End A/B test” button at the top of the screen.
This button will give you two options: “Choose winner” and “Edit and restart.”
Selecting “Choose winner” will open a window showing you stats about how each bot flow performed, allowing you to choose which one you would like to use going forward.
Whichever flow you select here will become the flow the playbook uses.
Testing a Bot Playbook
The “Test Bot” button allows you to test your playbook without skewing your metrics. For this method of testing to work, Drift needs to be installed on your site.
![]()
A few things to note while using the “Test Bot” button:
- Email Capture and Phone Capture: These skills will not fire if Drift already has this information. To test it as a new site visitor, you can open the test link in a new incognito browser, and the skills should fire.
- Book a Meeting: The user’s calendar will not be dropped in the conversation. This is expected test link behavior.
- Team Availability: This bot skill will not happen even if you, as the tester, are waiting for a response. This is expected behavior.
You can choose which page to test the bot on so you can see what it will look like for site visitors. URLs are pulled from site coverage, so if a page isn’t showing it, Drift might not have been installed on it for seven days.
Going Live
When you’re ready to get your playbook live on your site, navigate to the “Playbook is Off” button. In the drop down, choose “Turn playbook on.”
Make sure all of your changes are published before going live!
Help Documents in this Chapter:
What’s in this chapter
We know it can be difficult to measure the ROI of a specific tool in your tech stack. That’s why Drift offers reporting within the application and hone in on what really matters — pipeline and revenue.
Check out this Drift Insider video on reporting within Drift.
We offer a series of reports that show you Drift performance including bot performance, overviews, meeting and conversation reports, conversation analysis, pipeline, and more. We’ll review these reports in this chapter.
Drift Dashboard
Let’s start with your Drift dashboard. As an admin, this will be the first thing you see when you open Drift. There are a few key reports on your Drift dashboard such as your overview, influenced by Drift, meetings report, and conversations report.
Drift Overview
In your Drift overview, we show you three key numbers that indicate the health of your account.
- Number of conversations that happened within a given timeframe
- Number of emails Drift captured within a given timeframe
- Number of conversation qualified leads (CQLs) that were marked within a given timeframe
The date range for this report is customizable.
Influenced by Drift
Next up, the influenced by Drift report. If you have Salesforce connected to Drift, you will also see a Salesforce revenue dashboard. For complete information on that and how it’s calculated, click here.
Meetings Report
We offer an overview report of the meetings your team has booked through Drift. The date range follows the filter you set at the top of the dashboard.
Along with a line graph showing the cumulative booked meetings within the timeframe, there’s also a table showing the top five members of your team in terms of meetings booked. To view the full report, click here.
Conversations Report
Lastly, your overview dashboard will give you a quick view of your conversation stats. You can see a graph of conversations per day, along with a heat map of when new conversations were started. To see the full report, click here.
You can read more about the Drift dashboard here.
Sales Results
For Drift users with Salesforce connected, you have the ability to dive deeper into data with multiple Salesforce reports. If you navigate to Reports > Sales Results you will find four reports: overview, pipeline, closed won, and sales cycle.
Sales Results Overview
The first report we’ll cover is the overview report. To view this report use the left-hand navigation pane to find Reports > Sales Results > Overview.
The overview report was created to provide a consolidated view of all three of our standalone sales reports (pipeline, closed won, and sales cycle).
This report and its underlying reports contain the following filters: date range, opportunity type, and sourced or influenced. Clicking on a card will take you to its corresponding report.
Learn more about how to use the Drift overview report in this Insider video.
You can also learn more about the overview report in this help document.
Pipeline Revenue Report
The pipeline revenue report shows you the Drift influenced and sourced pipeline opportunities and corresponding revenue amount. To view this report, use the left-hand navigation pane to find Reports > Sales Results > Pipeline.
![]()
To export any of the data, simply click the “Export CSV” button below the graph. The exported CSV contains more data fields than what is shown in the pipeline report table. If you would like to understand what each field means, continue reading. Otherwise please skip ahead to learn about the closed won revenue report.
To read more about the pipeline revenue report, check out this help document.
Closed Won Revenue Report
The closed won revenue report works exactly like the pipeline revenue report above. The difference is that this report only shows opportunities that are in the closed won stage in Salesforce.
To view this report use the navigation pane to find Reports > Sales Results > Closed won.
![]()
To read more about the closed won revenue report, check out this help document.
The Sales Cycle Report
The sales cycle report shows the average number of days between the date the opportunity was created and the closed won date. This will show you how fast you are closing opportunities over time.
To view this report use the navigation pane to find Reports > Sales Results > Sales cycle.
![]()
To learn more about the sales cycle report, read this help document.
If you are curious about how Drift calculated influenced and sourced by Drift, check out this help document.
Chat Playbooks Report
The playbooks report gives you key insights into how your playbooks are performing. Understanding this performance is crucial to increasing the number of conversations you’re having with site visitors, leads you capture, and meetings you book.
The playbooks report contains two main reports, chat and site coverage. To navigate to the playbooks reports, go to Reports > Playbooks.
You can learn more about the playbooks report page in this Drift Insider video.
Drift Insider Note
Check out this class on analyzing and optimizing bot performance in the Playbook Basics Certification.
Chat Playbooks Overview
To navigate to the chat playbooks reports, go to Reports > Playbooks > Chat. Here, you will find five available metrics. We’ll review those now.
Impressions
Impressions are the number of times a playbook was shown to a site visitor. Each time the content of a playbook is shown to a site visitor, it counts as a single impression.
![]()
The screenshot above is an example of a single chat playbook impression.
Sends
Sends are the number of visitor sessions where a playbook was shown. Sessions begin when a user first visits a page with the Drift widget and ends when the user has not visited a page for 30 minutes or at midnight UTC.
Conversations
Conversations show the number of conversations that were started as a result of the playbook.
When a site visitor engages with a chat playbook, they start a conversation. They can engage by clicking a button or sending a message in response to a bot playbook, providing their email via an announcement playbook, or by initiating a conversation from a welcome message playbook.
Here, you will also see the engagement rate. The engagement rate is the rate at which that playbook is starting conversations. It’s calculated by the number of conversations divided by the number of sends.
![]()
Emails Captured
Emails captured shows the number of emails captured within a conversation started by a playbook.
A site visitor can provide their email in a conversation with the bot through the email capture skill or by simply typing it into chat. When Drift recognizes that an email has been sent as part of a conversation, it will be represented as a single email capture by the playbook that initiated the conversation.
If a contact had an email associated with it prior to a conversation, it will not count as an additional capture if they provide their email again.
Email capture rate will be shown here as well. This is calculated by the number of emails captured divided by the number of conversations.
Meetings Booked
Meetings booked shows the number of meetings that were booked within a conversation started by a playbook.
![]()
Here, you will also find a playbook’s meeting booked rate. This is calculated by the number of meetings booked divided by the number of conversations.
View the chat playbook report here.
For more information on chat playbook reporting and individual playbook reporting, view this help document.
Site Coverage
The site coverage report allows you to see how many of your site visitors are shown a playbook and how many are not. This helps identify gaps in your playbook strategy and create playbooks for specific audiences.
![]()
You’ll find the site coverage report by navigating to Reports > Chat Playbooks > Site Coverage. From here, you’ll be able to see the average coverage for your site, the highest coverage page, and the lowest coverage page.
To learn more about site coverage, view this help document.
Conversations Report
The conversations tab includes four main reports: chats, meetings, calls, and conversation analysis. You can view the stats for all of your conversations by navigating to the Reports tab and clicking on an area to explore on the sidebar.
Chats Report
Drift allows you to see where the most conversations are started on your site, what time of day is most popular for chats, and much more in your chat stats dashboard.
![]()
In this report, you can find:
- Total conversations: how many conversations have occurred in Drift within a given timeframe
- Overall median conversation length: how long a conversation is from first open to close
- Time of day: when most chats are occurring
- Where are site visitors starting conversations: the most common URLs your site visitors are starting conversations from
- How conversations are being tagged: most frequently used conversation tags added by the bot or a teammate
Learn more about the chats report in this help document.
Meetings Report
The meetings report allows you to dive deeper into how many meetings are being booked, who is booking meetings, and which reps are booking the most meetings.
You can access the meetings report by clicking Reports > Meetings.
![]()
To learn more about the meetings report, visit this help document.
Calls Report
The calls report will show you how many calls have been made with the chat to call feature in the conversation view.
Not only can you see how many calls were made in a given timeframe but you can also see data on the caller such as name, company, the agent who received the call, and how long the call lasted.
You can access the calls report by clicking Reports > Calls.
Conversation Analysis
Conversation analysis lets you discover hidden insights that would otherwise be locked away in all of your customer conversations. With conversation analysis, it’s now easier than ever to understand your customer and improve the buying experience.
To access conversation analysis simply click Reports > Conversations > Conversation Analysis.
You can learn more about conversation analysis in the Drift Insider video below.
You can also learn more about conversation analysis in this help document.
The team performance overview provides insight into how your chat reps are performing.
Here you can find metrics that include the overall median response time, median response time, who is responding to the most conversations, and which agent has the highest conversation performance.
You can access the team performance overview by clicking Reports > Team Performance > Overview.
Help documents in this chapter