Stage 1 Overview: Engaging Website Visitors
In the last Revenue Acceleration Guide: Setting Up Your Drift Account for Sales we asked you to think about your last buying experience.
Were you left with a bad taste in your mouth after an impersonal experience where you were left waiting without any help? Or did you have a memorable and enjoyable experience where your needs were met and everything was personalized to you?
We all want to replicate the latter and yet most B2B companies continue to shepherd people through forms and funnels — leaving them waiting 24–48 hours for a response from a sales rep.
The mission of Conversational Sales is to think about the buyer first and your business goals second. It’s the fastest way to build trust and credibility with buyers and turn them into customers.
With Conversational Sales, your sales team can immediately separate prospects from existing customers, personalize their engagement, and tailor pitches to create value. So then you can deliver the experience your buyer expects.
Now you know what Conversational Sales is and how to set up your Drift account. But how do you actually create that great buying experience?
Well, everything starts with a conversation. So in this guide, we’ll review the first stage in transforming your business so that every conversation has an impact: engaging website visitors.
Engaging Website Visitors Overview
Put yourself in the shoes of a sales enablement manager. Say you’re on the hunt for a new sales enablement software.
You start your search on Google, typing in “competitor to [your current solution]” and click on the first link for a company we’ll call Applinks.
When you get to Applinks, you realize this solution solves a lot of the challenges you are facing with your current software. You’re intrigued but have a few lingering questions.
That’s when a chatbot pops up saying, “Hey there! Welcome to Applinks.com. Can I help with anything?”
You type in your question and the chatbot jumps into action on the backend, making sure you are a qualified site visitor and routing in a rep that caters to your location and company size.
A rep steps right into the conversation, engaging you and further understanding your needs. They then go on to suggest you schedule a time to meet and drops a calendar.
![]()
That’s Stage One: Engaging Website Visitors.
Stage one is all about engaging the buyer and booking meetings for your sales team. When a buyer lands on your site, there is always an opportunity for you to engage with them (even if you’re sleeping — the bot has you covered).
The key to stage one is understanding the various ways you can spark a conversation — through chat, video, and email — and how to personalize your messages — using Drift Intel, Prospector, and previous conversations. Don’t worry, we’ll cover all of that in this guide.
There are many use cases you can use in stage one to engage your buyers, but one thing should stay the same: providing a better and faster experience that is all about the buyer.
To keep that top of mind, we came up with a simple framework with just three steps. We call it the Conversational Sales Framework.
The Conversational Sales Framework
Use the Conversational Sales Framework to create more opportunities, learn which buyers to focus on, and understand what matters to buyers.
There are only three steps you need to remember:
- Engage
- Understand
- Recommend
![]()
Let’s break down the three elements of the Conversational Sales Framework:
Engage: Connect and Respond
Conversational Sales means engaging with buyers on their terms — their channel, their schedule, and their goals. Your interactions aren’t pushy sales pitches. Instead, you’re having helpful, authentic, and proactive conversations. You’re listening to what your buyers need and responding thoughtfully. It’s a genuine interaction.
By engaging your buyers when their attention and intent are the highest, you maximize engagement and grow your pipeline.
Understand: Qualify and Influence
Conversational Sales relieves the burden on your sales team. Use automated bots and workflows to understand your buyers. Ask questions, use intent signals, and tap into other data sources to understand what each buyer cares about.
This framework is actually a two-way conversation. The days of sellers lecturing buyers are long gone. Sellers still have to explain their solutions, showcase services, and demo products, but buyers need time and space to ask their own questions. They must deepen their understanding and broaden their perspective.
As the conversation unfolds, you’ll know who is ready for a sales conversation. When the time is right, your sales reps can drop in. Then, they can captain the conversation, directing the discussion and influencing the buyer’s decision.
Recommend: Drive and Persuade
Once sales reps connect their calendars, you can automatically book meetings for qualified buyers directly within the conversation. Your sales team will appreciate waking up to calendars full of high-quality meetings.
But meetings, demos, and sales are just three possible outcomes. Recommend whatever’s best for the buyer — whether that’s a tip, an idea, a next step, a piece of content, or someone to connect with.
With the Conversational Sales Framework, you make the first move. You reach out and interact with potential buyers before they come to you. You learn about their challenges and goals. You drive the conversation forward and persuade the buyer to take the next step towards conversion.
Engage, understand, recommend. It’s that simple.
Drift Insider Note
Ready to get started? Download the Conversational Sales Workbook to visualize, plan, and implement Conversational Sales in your business.
One of the main ways you can engage website visitors and showcase the Conversational Sales Framework is using live chat. We’ll review how to navigate Drift’s conversation view and use live chat in the next chapter.
Conversations & Live Chat
What’s in this chapter
A strong chat strategy is key to Stage One: Engaging Website Visitors.
When the buyer is on your site, personalized conversations will make for a trusted and memorable buying experience, leading to more meetings booked.
So how do you start conversations or pick up a conversation routed to you? With live chat.
Live chat is where you can see conversations that have been started on your website. These conversations are handled by you, the bot, and even AI (Drift Automation). Most Drift users spend the majority of their time in live chat.
We’ll look at chat best practices and use cases in the chapters to come, but first, let’s review how to use and navigate Drift’s live chat.
How to Navigate Drift’s Live Chat
The conversations list makes it easy to find conversations at a glance.
You can use All Inboxes to monitor all your conversations as they come in, or filter by a specific inbox. Quickly switch between open, closed, or all conversations in each section, or create your own sections to categorize conversations just the way you like.
![]()
Messaging Features
Slash commands are useful when typing to quickly add tags, send transcripts, add internal notes, and more.
Slash commands are easy to find. Just click the lightning bolt in your conversation view.
![]()
Below is a list of slash commands, along with an explanation of what each one does.
| /invite |
Add a teammate to a conversation |
| /note |
Allows you to create internal notes in your conversations |
| /sendtranscript |
Send a chat transcript to the user you are chatting with |
| /tag |
Allows you to add a conversation tag to the conversation |
| /block |
Blocks a user from chatting |
| /unblock |
Allows a previously blocked user to chat again |
| /sync |
Syncs your conversation to your connected integrations (Salesforce, Marketo, HubSpot, etc.) |
| /savedreply |
Select a pre-written saved reply |
| /rating |
Drops a rating in the conversation, allowing the site visitor to rate the conversation |
Not seeing your slash commands in action? Make sure you’re using either the desktop app or the new conversation experience in your browser.
Read this help document to learn about each slash command in further detail.
Rich Text
Drift allows you to easily format your text while you type.
Just highlight the text you would like to format. Then the option to make that text bold, italicized, and/or underlined will automatically pop up. You can even use this to hyperlink text by clicking the link icon.
You can also use key commands as a shortcut for these alterations: Command + B (⌘+B) to bold, Command + I (⌘+I) to italicize, and Command + U (⌘+U) to underline.
![]()
Pasting Images and Attaching Files
In live chat, you can paste images into the message composer. You can copy any image file (Command+C) and paste it directly into your composer (Command+V). Additionally, when you take a screenshot (Command+Control+Shift+4) you can directly paste that into the message composer as well (⌘+V).
Conversation Sections
Sections allow you to group conversations together. This allows admins to review conversations all in one spot. To begin grouping your conversations into sections, click the plus sign next to “Create Section” on the left-hand side.
From here, you’ll be able to group conversations by any combination of team, status, or tag. Once you have your sections created, you can drag and drop them to order the sections in the way that works best for you.
![]()
For more details on conversation statuses, check out this help doc here.
Mobile App Overview & Download
The Drift mobile app (“Drift for Sales”) is a great tool for managing conversations, engaging with customers, and collaborating with teammates. It’s available on iOS and Android devices and is a great alternative to our web app for on-the-go chatting and inbox management.
Download on the Apple App Store here or scan the QR code below:
Get it on Google Play here or scan the QR code below:
Desktop App Overview & Download
The Drift desktop app is an application for your desktop device which will allow you to quickly access your Drift conversations. Currently, the app only supports live chat.
So why should you download the desktop app?
The Drift desktop app was built so you can respond to leads faster than ever. The app is much faster, simpler to use, and comes loaded with new features. Download it, sign in, turn on desktop notifications, and get alerted immediately when leads come to your site.
Click below to download the Drift desktop app:
Download Drift for Mac or scan the QR code below:
Download Drift for Windows or scan the QR code below:
To learn more about downloading the desktop app and installing it, check out this help document.
Desktop App Features
In addition to the features outlined above, the desktop app has many features to help streamline your workflow. We’ll outline them here.
All Your Conversations in One Place
In the sidebar to the left, you’ll find every conversation you’ve ever had so you don’t have to worry about losing a conversation. Simply scroll down to find an older conversation.
Search Your Conversations
You can search all the conversations you’ve had by typing the name of the contact or a phrase that was used in the conversation.
Clean Conversation View
Conversations that haven’t had any activity for a few days become inactive and are hidden from view.
Fast and Reliable Desktop Notifications
Using the Drift desktop app, you can respond to visitors quickly using desktop notifications. All you have to do is turn on desktop notifications and let the leads roll in from your site. You can also respond inline directly through the notification.
![]()
In addition to inline replies, the app also has notification badging. You will be able to clearly see when you have a notification that needs your attention. A red dot will appear at the top right of your desktop app icon to indicate that you have a notification to reply to.
To learn more about the Drift desktop app and its features, read this help document.
Agent Status
Agent status is your personal availability status. The purpose of this status is to handle how to notify you, how to assign you to conversations, and whether to drop your calendar or route you into live chat.
There are two statuses: available or away. You can click on your avatar in the bottom-left corner of the page to set your status.
![]()
Here are the status types and what they mean:
Available
- You will get the normal notifications that you have turned on in your notification settings.
- New conversations will be assigned to you (per your routing setup).
- You will be routed into conversations with your target accounts.
Away
- You won’t be added to any conversations when you’re “away.”
- Your calendar will drop for your target accounts.
Pro Tip: At Drift, our support team works in shifts. When one person starts their shift, they turn their status to available, and the agent whose shift is over turns their status to away. This adjusts routing accordingly.
You can also set the amount of time that you’re away so you don’t get any new conversations while in a meeting or on your lunch break.
To do this, simply select your away time by clicking on your avatar in the bottom left corner of the page.
![]()
Conversation Status
Conversation statuses help you easily keep track of your active and inactive conversations.
All inboxes in Drift come with two conversation statuses — open and closed.
Open are your active, ongoing chats. We recommend keeping your conversation view on “open” to help declutter your chats and make sure you don’t miss any messages.
If you close out a chat and your site visitor chats back in, this will reopen the conversation. Chats between bots and site visitors are considered open conversations.
Closed conversations will eventually be archived but you can also delete them. To close multiple conversations at the same time, click the ellipsis button to the right of “My Conversations” to expand the drop-down menu where you can find “Close all my conversations.”
To change the status of a conversation, select the conversation and then click the current status in the top right corner of the composer. Then select the new status.
To change what conversation status is displayed in your sidebar, you can click the pill-shaped button under “My Conversations” for the status you would like to view.
![]()
To read FAQs and learn more about conversation statuses, check out this help document.
Syncing Conversations
Once your conversation has wrapped with a site visitor, we can sync the information from that conversation right over to your preferred CRM.
There are currently three ways to sync your conversations: auto sync, manual sync, and the /sync command. We’ll go over all three below.
Auto Sync
Auto sync is a “set it and forget it” type of sync. By using this method, conversations will automatically sync once they’ve timed out.
To enable auto syncing for your conversations, go to Settings > Conversations > Advanced and select “Use session timeout to sync data to your integrations.”
When setting up conversation session timeout auto sync, make sure to select the amount of “no activity” minutes. In the screenshot below, you’ll see we have ours set to three minutes, meaning the sync will occur three minutes after the last action in the conversation.
![]()
Pro Tip: We suggest your admin configure auto sync as your first form of syncing.
Manual Sync
With manual sync, you can simply press a button and have your conversation sync instantly to your integration. This can be used to update the information being passed over while still having a conversation. It also gives you the choice to not sync a conversation in the event you have not set up auto syncing.
To manually sync, click the sync button at the top right-hand side of the conversation view.
/Sync Command
This command works the same as the manual sync option button. However, instead of pressing “manually sync,” you can use a slash command in the conversation to sync the conversation details to your integration.
To sync using the slash command, simply enter /sync into the conversation field as seen below.
To learn more about sync options, read this help document.
Conversations View
The conversations view and the conversation sidebar provide more information to Drift users about who they’re chatting with to help them personalize the conversation.
The information that you see in the sidebar can come from:
Check out the Drift Insider class below to learn more about how to use the conversations view.
Navigating the Conversations View
Top of the Conversations View
When you are chatting with a site visitor, we are able to pull available information about this person and their company so you know who you are talking to and can better personalize the conversation.
Here is a list of the information we display if it’s available:
- Site visitor’s name
- Company name (website is hyperlinked in the example)
- Social media handles
- Number of employees
- Company’s MadKudu lead score
- Where the site visitor is located
- Who else is involved with the chat (previous or current participants)
Bottom of the Conversations View
At the bottom of the conversation view, you can talk to the site visitor, add images, and more.
![]()
Here’s a breakdown of the actions you can take here:
- Use slash commands to post an internal note, add an attachment, or use a saved reply.
- Use the lightning bolt icon to access slash command shortcuts.
- Use the smiley face icon to insert an emoji.
- Use the calendar icon with a checkmark button to insert your calendar or a teammate’s calendar into the conversation.
- Use the phone icon to initiate a chat to call.
- Use the Zoom icon to initiate a zoom call.
Conversation Details
Conversation details live on the right-hand side of the conversation view. This gives you quick access to the demographics on who’s chatting in.
The information in this sidebar can be modified via several integrations. It’s a great tool to help you identify your customers and create a better buying experience.
To access the conversation details sidebar, click the “i” icon on the right-hand side of the conversation view.
![]()
If you’re on the Drift Free plan or above and a visitor provides an email, their information will automatically be supplied by Clearbit. If you’re on Drift Premium or above, Drift Intel can also identify company information on anonymous visitors.
From this view, you’ll find contact info, company info, conversation details, recent activity, and information supplied by any integrations you may have installed into Drift.
You can see what information is supplied by which service by hovering over the integration icon in the company details box.
![]()
Supported integrations for this sidebar include Salesforce, Clearbit, 6sense, Marketo, Salesforce Marketing Cloud Account Engagement (formerly Pardot), Eloqua, and others. To install an integration, go to Settings > Integrations.
Here’s a breakdown of what you can find in the conversation details section:
CQL Score
A conversation qualified lead (CQL) score is an indicator of the buyer’s qualification and how interested they are in your product. This qualification can be applied manually or by a bot.
Salesforce Details Card
If you have the Salesforce integration, we’ll pull in any available lead or contact information. We find this data using the site visitor’s email address, whether it’s an exact match or has a matching domain.
HubSpot Details Card
If you have the HubSpot integration, we’ll pull any available information on the site visitor. We find this data using the email address of the visitor or if the visitor has the HubSpot cookie and toggle turned on.
Drift and Custom Attributes Card
Drift comes with default attributes, custom attributes, and sourced attributes (from Clearbit or Demandbase). Drift default and custom attributes are displayed in the “About” section and can be viewed by clicking “Show more attributes”.
Custom attributes will be displayed first and Drift attributes will be displayed towards the bottom of the card.
You can customize which attributes show up in the conversation view by going to the Contacts and navigating to the Contacts Settings.
Conversation Info Card
Use this card to see which page the site visitor started the current conversation on and what browser or device they’re using.
Recent Activity Card
This card will show up if the contact has had a previous conversation with you. Each conversation will show up separately. Clicking on the “View full activity timeline” will take you to the individual contact page’s historical timeline which includes a bit more detail.
To read more about the conversation view, check out this help document.
Help Documents in this Chapter:
What’s in this chapter
“Live chat lives in the background all day while I’m working. I couldn’t imagine my day without it. Real-time notifications and chat give you a way to engage with your buyers when their intent is at its highest.” – Tate Knapp, Enterprise SDR at Drift
![]()
Consider these two different buying scenarios:
The first buyer is a junior-level developer named Matt. He’s struggling to keep up with his workload, but he can’t figure out why he’s falling behind. He does a quick search for “good tools for developers,” stumbles upon your website, and reads through some of the high-level marketing material. Eager to learn more, he requests a demo.
The second involves Molly, the head of product at a high-growth startup. She’s been experiencing automation challenges while scaling and her existing automation tools feel lackluster. She visits your website to learn more after her colleague recommended she check it out.
Clearly, these two situations are different. Molly has a budget and the authority to make purchasing decisions. She’s also identified her crucial challenge.
Matt’s situation is the polar opposite. Here, the buyer lacks any purchasing authority and doesn’t fully understand the specific problem for which he’s trying to solve.
Despite their differences, many sales processes will treat both buyers in the same way.
This is where you come in.
Using live chat, we can — and should — individually engage each buyer.
To do that, we’ll use the Conversational Formula (the four Ws) and the Conversational Framework.
Drift Tip: You can review the four Ws in our last guide, Revenue Acceleration: Setting Up Your Account for Sales.
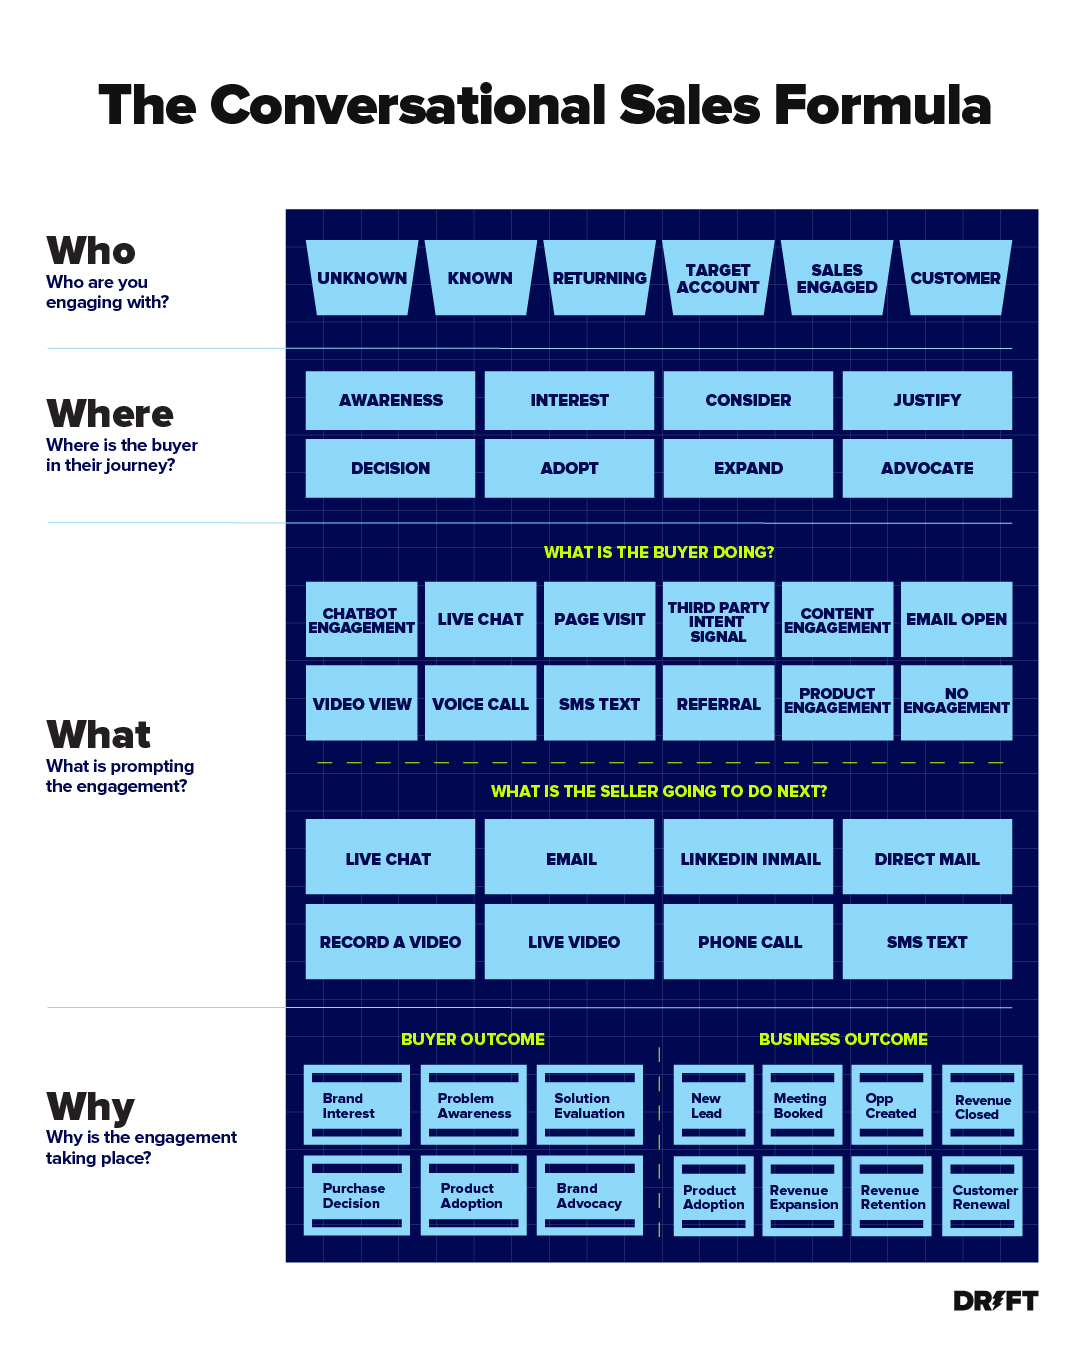
As a reminder, the Conversational Sales Formula (also known as the 4 Ws) tells you who the buyer is, where they are in the buying journey, what prompted the engagement, and why they are interacting with you.
Then, you can use the Conversational Framework (engage, understand, recommend) in live chat to delight your buyer.
Take a closer look at live chat in this Drift Insider video.
Chat Best Practices for Sales Reps
Applying the Conversational Framework and Formula
Let’s break down Tate’s conversation below and see how he applied the four Ws of the Conversational Formula and the Conversational Framework.
![]()
The 4 W’s of this conversation:
Who are they?
Returning (inbound): Returning website visitor or lead who visits the website often.
Where are they in the buying journey?
Interest: Their website behavior demonstrates that the lead is aware of your product and is interested enough to revisit.
What prompted the engagement?
Buyer: Page Visit, Seller: Live Chat
The buyer is browsing your website. Tate will drive a live conversation to measure their intent.
Why is buyer and seller interacting?
Buyer: Brand Interest, Seller: New Lead
The buyer (Chris) will get a grasp of the brand and a high-level overview of the solution. The business will create a new lead.
The four Ws are a powerful tool for analysis. It lets you study the buyer and unpack who they are and what they want out of your conversation. But the formula doesn’t teach you what to do next. You know who you’re talking to but not how to talk to them. To take that next step, you need the Conversational Framework for Sales.
Applying the Conversational Framework in this conversation:
Engage: Connect and Respond
- Tate greets the visitor upon their return to the website.
- He catches up with the visitor and touches base for updates.
- Tate leverages insights regarding previous interactions.
Understand: Qualify and Influence
- Tate finds the buyer’s pain.
- He asks the buyer what interests them about the platform.
Recommend: Drive and Persuade
- Tate schedules a demo for a tailored look at how we can help.
After the conversation:
- He sends a nurture to colleagues or stakeholders.
- He sends a video follow-up
Best Practice Analysis: Live Chat
The previous section outlines the framework and formula you should always follow in chat. But to take it a step further, we asked some sales experts on our team for some advice on chat best practices. Here’s what they had to say.
- Introduce yourself to the buyer. Feel free to include a personal anecdote.
- Keep it conversational and friendly.
- Ask questions that move the conversation along.
- Keep your replies short and sweet. Don’t write paragraphs back to the buyer.
- Use context from the page they are on and previous conversations.
- Don’t just badger the buyer with questions. Respond, then keep the conversation moving.
- Include emojis 🤩
- Ask open-ended questions to gauge interest.
- Utilize Chat to Zoom to capitalize on the now.
Let’s take a look at these best practices in the following conversations.
![]()
What makes this a good conversation:
- Great conversational tone
- Friendly and enthusiastic
- Helps the buyer accomplish what they’re trying to do right away and takes the conversation straight to Zoom
What makes this a good conversation:
- Short replies back and forth
How to improve the conversation:
- Keep it conversational. Mark asks a lot of questions in a row to the site visitor.
- Use context from the bot and Drift Intel. Don’t ask questions you don’t have to.
- Be a trusted advisor. Mark could offer recommendations as he is chatting with Julie.
What makes this a good conversation:
- Friendly and conversational tone
- Asks an open-ended question to gauge interest
- Short and quick responses
How to improve the conversation:
- To be more engaging, Brandon’s introduction should add a question with context from the 4Ws. For example, “Hey Sara! It’s Brandon from Drift. What brings you to the pricing page today?”
- As the conversation progresses, don’t forget to strike a good balance between answering questions and asking questions.
What makes this a good conversation:
- Elizabeth, Dan’s sales development rep (SDR), jumps right into the conversation and engages the site visitor.
- When Dan joined, he used a smooth transition to introduce himself and keep the conversation going with Reed.
How to improve the conversation:
- Dan could use a more personalized intro using past context. For example, “Hey Reed! Dan here — your account manager at Drift. Good to see you on the site again. Any questions I can help answer?”
What makes this a good conversation:
- Stacy has a quick response time and jumps into the conversation quickly.
- Conversational and friendly introduction
How to improve the conversation:
- Stacy jumps in too quickly to book a meeting with an account executive.
- Stacy could provide more information in chat then provide a resource and recommended next step.
Drift Insider Note:
Want to learn more? Sign up for the Sales Tip of the Week newsletter for weekly tips from Drift selling experts.
Chat Best Practices for Managers and Admins
As a sales manager, you are constantly working to enable your sellers. So, here are five best practices you can use to set up your team in chat and help them create faster, better, and more conversational experiences.
You can also check out our Drift Insider course Management: Enabling Your Sales Team here.
1. Saved Replies
Answering the same questions and messages repeatedly can be time-consuming, so we created saved replies. This allows reps to respond to messages almost automatically and shortens their response time.
Drift admins can create and manage saved replies by going to Settings > App Settings > Conversations > Saved Replies. You can also click here for easy access.
To add a new reply, just click on “New saved reply” at the top of the screen. Your sales team can then insert saved replies in chat with the slash command /savedreply or by simply selecting the + button and selecting “Insert saved reply.”
You can learn more about saved replies in this help document. Reps can learn how to use saved replies in this guide’s Conversations View section.
2. Integrate with Tools You’re Already Using
Today, the customer is in control, business is digital, and the best experience wins. It’s critical that not only teams but also technology work as one. That’s why Drift offers more than 50 integrations, all aimed at helping you unlock your data to provide a better experience for you and your customers.
Integrating your current tech stack with Drift allows you to unlock insights. Plus, reps get to work with tech they already know.
For example, if you’re already comfortable using Slack and spend most of your day in that platform, why not integrate live chat with Slack and have all of your conversations there?
You can learn more about the importance of these integrations in the video below.
3. Show Your Face
One of the pitfalls of “old school” chat software was that visitors had a hard time telling who they were chatting with.
Is it a robot? Or is it a human? And if it’s a human, is it an actual employee of the company? Or is it someone from a third-party service?
With modern live chat for sales, you can make it clear who you are from the get-go by having sales reps upload a photo of themselves. So when a rep is routed into the conversation, the buyer knows who they are — like in the example below with Chelsea.
Reps can upload photos by going to Settings > My Settings > Accounts. You can also read more about this in the first Revenue Acceleration Guide: Setting Up Your Drift Account for Sales.
4. Set Team Availability
Ideally, your reps’ response time is swift. (We recommend the average response time to be under 30 seconds.) But sometimes, your reps may have gotten up from their desks and forgotten to set themselves as away.
But no worries if your rep misses a chat. Drift has you covered.
Team availability jumps in with a bot message when your reps miss a chat. You can configure Drift Bot to help by going to App Settings > Drift Bot > Team Availability.
Here’s what you can configure:
How long you want the Drift Bot to wait before helping:
- 30 seconds
- One minute
- Two minutes
- Five minutes
- 10 minutes
How you want the Drift Bot to help:
- Drop the calendar of the routed agent
- Route to a different agent
- Leave an away message
Customize the away message for your site visitor:
- Example: “Just jumping in here — looks like [agent] isn’t available right now. You can schedule some time to chat with them here, or just leave a message and I’ll make sure they get it.”
![]()
You can learn more about team availability in this help document.
5. Hold a Weekly Chat Analysis
At Drift, our SDRs meet weekly for a chat analysis. In that meeting, inbound and outbound reps bring up conversations they’ve had with prospects in chat.
SDRs then receive feedback on the conversations from peers and managers. They get to learn from their peers and understand what tactics are working and not working.
Julianne, Director of Sales Development at Drift, says “We hold these meetings for two reasons. The first is to make sure we’re keeping the customer at the center of everything we do. The second reason we meet in these group settings is to foster a learning environment, which is particularly important in a remote setting.”
You can read more about Julianne’s Day in the Life as Director of Sales Enablement here.
Help Documents in this Chapter:
Stage 1: Engaging Website Visitors Use Cases
What’s in this chapter
In chapter one, we reviewed what stage one entails and looked at the Conversational Framework. In chapter two, we dove into live chat and how to navigate it. Chapter three went over best practices you should always keep in mind when having a conversation in chat.
Now, it’s time to apply everything you’ve learned and review use cases you can use today with potential buyers.
You should decide which use case to use depending on who your buyer is, where they are in the buying journey, what prompted the engagement, and why they are interacting with you.
We don’t recommend you use every single play for every single touchpoint, but they’re there for you whenever you think they will be most effective.
Drift Insider Note:
Want to follow along? Download the Conversational Sales Workbook.
You can also check out the Drift Video below, which reviews the use cases that make up the “engage” portion of the Conversational Framework for Sales.
The Frequent Flyer
Buyers today complete 57% of their purchase decision before talking to a sales rep. Instead, they’re interacting with your site through blogs, pricing pages, and product feature pages. Don’t sit back and wait for them to come to you. Engage with return visitors first, leveraging insights from previous interactions.
Use the Frequent Flyer use case to drive a conversation with a returning site visitor who frequently visits your site.
Let’s break down the use case using the Conversational Sales Framework:
Engage: Connect and Respond
- Greet the visitor upon their return to your website.
- Catch up with the visitor and touch base for updates.
- Leverage insights regarding previous interactions.
Understand: Qualify and Influence
- What is your buyer’s pain?
- What interests them about the platform?
- How does this align with the buyer’s goals?
Recommend: Drive and Persuade
- Schedule a demo for a tailored look at how you can help.
- Send nurture to colleagues or stakeholders.
- Follow up with a video message.
Here’s an example of the Frequent Flyer in chat:
![]()
Content Recap
A buyer from a target account just downloaded an eBook. That’s awesome! But…now what? Use the Content Recap play to leverage content consumption and drive a sales conversation on the topic.
Let’s break down the use case using the Conversational Sales Framework:
Engage: Connect and Respond
- Articulate your thoughts on the content that was consumed.
- Share your response to the content.
- Point out relevant pieces of the material.
Understand: Qualify and Influence
- Ask value-driving questions to uncover more information.
- What made you check out this material?
- What are your goals?
- What inspired your research on [x] topic?
Recommend: Drive and Persuade
- Leverage the content to pitch a solution.
- Schedule a demo to understand how Drift can help with the topic.
![]()
Chat to Zoom
One of the best practices we reviewed in the last chapter is to capitalize on the now. The Chat to Zoom use case helps you do just that. After building rapport in live chat, switch directly to Zoom for a deeper dive.
Let’s break down the use case using the Conversational Sales Framework:
Engage: Connect and Respond
- Introduce yourself and the brand.
- Understand the intent behind the buyer’s research.
Understand: Qualify and Influence
- Identify the buyer’s current setup.
- Define the buyer’s pain point.
- Suggest a live video conference for a deeper dive.
Recommend: Drive and Persuade
- Present insights.
- Articulate value from a high level.
- Book a meeting to continue the conversation.
AI Assist
AI chatbots engage and qualify every single site visitor, no matter when they hit your site. Use the AI Assist to leverage data collected in an AI conversation to add personalization to your outreach.
Let’s break down the use case using the Conversational Sales Framework:
Engage: Connect and Respond
- Surface the AI conversation with the buyer.
- Mention specific insights provided.
Understand: Qualify and Influence
- Mention the pain listed and share how your solution can help.
- Share customer stories of buyers who experienced a similar pain and solved it.
- Use customer social proof in regards to the pain provided.
Recommend: Drive and Persuade
- Schedule a demo for a closer look.
Steal this email template for the AI Assist:
![]()
Abandoned Scheduler
There’s nothing worse than getting ghosted. You get all excited about the potential lead, then hear nothing back. So this use case is all about how you can get back in the game.
With the Abandoned Scheduler use case, re-engage with an inbound lead who showed intent but didn’t book a meeting.
Let’s break down the use case using the Conversational Sales Framework:
Engage: Connect and Respond
- Introduce yourself and the brand.
- Reference the buyer’s attempt to book a meeting.
- Acknowledge insights into the buyer’s business.
Understand: Qualify and Influence
- Prompt more details on their pain point.
- Place urgency on the demo and solution.
Recommend: Drive and Persuade
- Provide details to move the conversation forward.
- Reschedule the demo.
Here’s a template you can steal:
![]()
Content Consumer
If you see a buyer browsing the blog page or reading a specific piece of content on your site, jump into chat with the Content Consumer use case.
The Content Consumer uses content consumption behavior to drive a conversation with an inbound lead in live chat.
Let’s break down the use case using the Conversational Sales Framework:
Engage: Connect and Respond
- Start with a content-specific introduction.
- Introduce yourself and chat about the content being consumed.
Understand: Qualify and Influence
- What is the buyer looking to learn about?
- Why is the buyer looking to learn?
- Does the buyer leverage [x] concept currently?
Recommend: Drive and Persuade
- Introduce the product.
- Recommend a solution.
- Schedule a demo.
Below is an example of this play in live chat:
![]()
No Show
Scheduling a meeting and then getting a no show from your buyer is disappointing. But there’s no reason to give up hope. Use the No Show play to send a comprehensive follow-up video with a prospect who didn’t show up to a meeting in an effort to reschedule.
Let’s break down the use case using the Conversational Sales Framework:
Engage: Connect and Respond
- Reference the prospect’s behavior and summarize your interaction so far.
- Set an agenda for the video.
Understand: Qualify and Influence
- Articulate how your solution can help solve the buyer’s problems.
- Provide a summary of what you will share on your first call.
- Use value-driving questions to prompt engagement.
Recommend: Drive and Persuade
- Define why the buyer should be interested in connecting.
- Reschedule the conversation to touch base.
Chat to Call
It’s great to connect with a buyer in live chat. To take it to the next level and capitalize on your buyer’s high intent, use the Chat to Call play. With the Chat to Call play, use live chat to connect with a website lead and jump on a call for a deeper dive.
Let’s break down the use case using the Conversational Sales Framework:
Engage: Connect and Respond
- Initiate a live chat conversation.
- Collect details and recommend a phone call.
Understand: Qualify and Influence
- Initiate a phone call for a deeper dive into the buyer’s needs.
- Introduce yourself and your goals.
- What are the buyer’s biggest initiatives?
- What pain is the buyer experiencing?
- Briefly articulate how your solution can help.
Recommend: Drive and Persuade
- Jump on the phone to touch base.
- Schedule a follow-up call for a more in-depth look.
Check out this live chat below using the Chat to Call play:
![]()
What’s in this chapter
Using Drift Video, you can engage prospects and customers with quick, personalized videos and GIFs. This allows you to start more conversations, shorten sales cycles, and engage more of the buying committee.
Drift Video has many great features including easily recording and sharing videos, receiving real-time notifications, and starting conversations or booking a meeting right from your video. We’ll review those features in depth below.
Downloading Drift Video
With the Drift Video Chrome extension, you can record from Google Chrome in three clicks. You can save even more time with the extension’s integrations with popular platforms like Gmail, Zoom, LinkedIn, Outreach, and more.
Click here to download the extension from the Chrome Web Store 📹
On the webpage, click Add to Chrome. You’ll need to accept the permissions, and then you’ll see the installation complete.
Click the installed extension and you’ll be prompted to sign in with your existing Drift credentials or create a new account.
We also have a mobile app available so you can record quick videos on the go. You can download it on the Apple App Store here. Also, make sure you have the Drift mobile app downloaded. It’s available on iOS and Android devices and is a great alternative to our web app for on-the-go chatting and inbox management.
Notifications
Managing Drift Video Notifications
Drift Video can immediately notify you on desktop and mobile when people engage with your sales videos. You can then jump in to chat in real time.
Managing Notifications in the Chrome Extension or Browser
Your notification settings can be found by clicking your profile icon > Notifications. Or, you can click here.
Here, you can set your preferences so that you will be notified of video views via both push and email notifications.
![]()
You will be notified if someone starts a conversation from a video you sent, following your regular Drift Chat notification settings.
You can access your notifications by clicking your profile icon > Notifications, or by reading the Notifications section in this guide.
Managing Notifications on Mobile
In order to manage or snooze notifications from the mobile app, click on your avatar and then click Manage Notifications.
From there, you can snooze notifications, toggle sounds, and change which conversations you’re notified about.
![]()
Conversations with Drift Video
Once you’ve been notified that someone is watching your video in real time, you can have a conversation with the prospect right away.
A reminder about notifications here:
- Browser:
- To get notifications when someone is viewing your video so you can chat with them, make sure to follow these steps to set up your notifications.
- If you are experiencing any problems with your notifications, follow these steps to troubleshoot the issue.
- Email:
- If you’re a Video only user, you will always get an email notification when someone starts a conversation with you, but not if they justview the video.
- If you have a chat seat, you can control your email notifications settings here.
Be sure to also read about Drift Video notifications in the section above.
To get to your conversations, start by clicking on the Drift Video extension.
At the bottom of the pop-up, click Conversations.
You are then brought to your Drift Video conversation inbox.
Here you can see all past and present conversations started from your videos.
Check out the Drift Insider video below to learn more about Drift live chat video training.
Connecting Drift Video with Your Zoom Account
Drift Video makes it easy to turn Zoom meetings into shareable video content with our Zoom integration.
This integration is available for all Drift Video users and for customers who have Zoom Pro or above. You will have to record meetings to the cloud.
Setting Up the Zoom Integration
To set up the integration between Drift Video and Zoom, first log in to your Drift Video account. (You do not need to be an admin account.) Go to Settings > App Settings > Integrations > Zoom. (Or, you can just click here.)
Once connected, you’ll find your Zoom recordings under the My Recordings section.
![]()
If you’d like to remove the Zoom integration with Drift, you can do so by logging into your Zoom account. Once logged in, select Manage on the top right-hand side. From there, you’ll want to go to Installed Apps > Drift Video and click the Uninstall button.
How the Zoom Integration Works
Once your video is uploaded, you can click on the video in your library to rename it or edit it. For more info on editing Drift Videos, check out our help doc here.
Check to make sure your meetings aren’t being recorded locally, as only your recordings in the cloud will show. You can automatically record all your meetings to the cloud by updating your Zoom settings.
![]()
For instructions on changing your Zoom settings, check out the Zoom help doc here.
With Drift Video, you can also see who watched your video, how much of it they watched, and when they watched it. If you’d like to read more on user engagement with Drift Video, check out our blog post here.
How to Record a Drift Video
From the extension, you’ll see a modal presenting you with three different video layouts. You’ll be able to choose from:
- Screen & face: record your screen and show your face
- Screen only: record only your screen
- Face only: record only your face
Once you choose an option, you’ll then want to click Start Recording. If you select one of the two options that include screen recording, you’ll see a modal where you can choose if you’d like to share your entire screen, an application window, or an individual tab.
Once you’ve made your selection, click Share. You’ll see a three second countdown, and then your video will begin recording.
If you’ve chosen face only, you’ll be brought right to the countdown, and then your video will begin recording.
Once your video has started recording, you’ll see a few things.
At the left of your screen, you’ll see a status bar with the red recording symbol, the length of your recording, a restart option, pause button, and stop button.
You’ll also see a bar appear at the bottom of your screen where you can stop sharing at any time. You can also choose to hide this bar.
When you’re finished, use either the stop symbol or click Stop sharing. You’ll be brought to a window where you can edit your video, make a GIF, and more.
How to Save and Share Your Videos
Once you record a video, it’s automatically saved to your library. From there, you can change the video name to something unique and personalized.
We make sharing a recording easy by copying the video’s link directly to your clipboard. Once you finish recording, you’ll see a notification like the one shown below. Then, you can immediately paste your video into an email, message, etc.
To share from the Video extension, click into your extension, then click Copy. This allows you to paste the video directly into your messages.
From within the library, you can click into any video and click the share button in the top right corner. Here, you can easily copy the link and control the privacy of that video.
How to Edit a Drift Video
Drift Video gives you the ability to crop a video, change its name, and more.
Trimming a Video
Once you’ve created a video, you can easily crop it.
When you’re finished recording, press Edit video. You can also edit your videos at any time by clicking into your library.
Once you’ve selected the video you want to edit, you can trim it by clicking Trim video.
Use the slider to select which portions of the video you’d like to include. When you’re finished, click Save.
Renaming a Video
Renaming a video is simple. Click the pencil icon at the top left of the video editor screen. There, input the name you want and click the check mark.
Create a GIF from Your Video
From your library, click any video to access the editing screen. Click the ellipsis and then Convert to GIF.
Next, you’ll be presented with options on the screen where you can:
- Crop the portion of the screen you’d like to capture.
- Change the length of your GIF.
- Set where in the video you’d like your GIF to start and end.
You’ll see a preview of the GIF play on loop according to the settings you put in. When you’re finished, click Create GIF.
Pro Tip: You can also find out how to create a GIF step by step in the video here.
How to Use Custom Branding for Your Drift Videos
To personalize the video experience even more, you can use custom branding for your video player. Custom branding is available for Team plan users.
To change the branding of your videos, head to your Account from the extension. You can do this by clicking Settings or your avatar in the bottom right corner.
From your Account Settings, click Organization Settings > Custom Branding. Here you can customize the appearance of your video player.
You have the ability to add a Company logo, edit your Company URL, and choose between Light or Dark mode.
Your company logo will appear in the top left of the video player.
For more information on Drift Video, check out these Drift Video help documents.
Help Documents in this Chapter:
What’s in this chapter
Overview of Reporting for Sales Teams
Drift offers engagement metrics, insights, and analytics to continuously improve your sales team’s performance — all within the Drift application.
Using this reporting, you’ll be able to uncover average response time, which sales reps are booking the most meetings, what web pages are leading to the most conversations, an overview of revenue and pipeline, and more.
Check out this Drift Insider video on reporting within Drift.
Here’s how our Director of Sales Development uses Drift reporting in her day-to-day:
“When I measure an SDR team, I look for both leading and lagging indicators. Lagging indicators you can think of as your output or your results. Leading indicators you can think of as your input or your effort. Those include things like conversations with prospects, outbound calls made, contacts added to sequences, and activity.
Lagging indicators typically come in the form of opportunities. That’s how SDR teams are typically measured — on sales-qualified opportunities (SQOs).
With Drift, you can get really granular with those input metrics. Three metrics we use to measure with Drift are conversations with prospects in our platform, meetings scheduled in our platform, and most importantly, the conversion between the two.”
Read more about Julianne’s day-to-day as Director of Sales Development here.
There are a few reports that will help you uncover these insights. We’ll review them below.
Sales Results
For Drift users with Salesforce connected, you have the ability to dive deeper into data with multiple Salesforce reports. If you navigate to Reports > Sales Results you will find four reports: overview, pipeline, closed won, and sales cycle.
Sales Results Overview
The first report we’ll cover is the overview report. To view this report, use the left-hand navigation pane to find Reports > Sales Results > Overview.
![]()
The overview report was created to provide a consolidated view of all three of our standalone sales reports (pipeline, closed won, and sales cycle).
This report and its underlying reports contain the following filters: date range, opportunity type, and sourced or influenced. Clicking on a card will take you to its corresponding report.
Learn more about how to use the Drift overview report in this Insider video.
You can also learn more about the overview report in this help document.
Pipeline Revenue Report
The pipeline revenue report shows you the Drift influenced and sourced pipeline opportunities and corresponding revenue amount. To view this report, use the left-hand navigation pane to find Reports > Sales Results > Pipeline.
![]()
To export any of the data, simply click the “Export CSV” button below the graph. The exported CSV contains more data fields than what is shown in the pipeline report table. If you would like to understand what each field means, continue reading. Otherwise please skip ahead to learn about the closed won revenue report.
To read more about the pipeline revenue report, check out this help document.
Closed Won Revenue Report
The closed won revenue report works exactly like the pipeline revenue report above. The difference is that this report only shows opportunities that are in the closed won stage in Salesforce.
To view this report, use the navigation pane to find Reports > Sales Results > Closed won.
![]()
To read more about the closed won revenue report, check out this help document.
The Sales Cycle Report
The sales cycle report shows the average number of days between the date the opportunity was created and the closed won date. This will show you how fast you are closing opportunities over time.
To view this report use the navigation pane to find Reports > Sales Results > Sales cycle.
To learn more about the sales cycle report, read this help document.
If you are curious about how Drift calculates influenced and sourced by Drift, check out this help document.
The team performance overview provides insight into how your chat reps are performing.
Here you can find metrics that include the overall median response time, median response time, who is responding to the most conversations, and which agent has the highest conversation performance.
You can access the team performance overview by clicking Reports > Team Performance > Overview.
Help Documents in this Chapter: